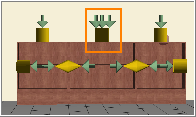
Some components in CET Designer can be stretched in the width, depth and height dimensions. Clicking and holding the yellow snap points (see Figure 1) will enable stretching and shrinking of components. The green arrows indicates in which direction the component can be stretched or shrunk.

Figure 1
|
Note: The green arrows that may appear beside the yellow snap points always show the direction in which the object is stretched. |
There are two methods that can be used for stretching components by width:
Method 1 – Stretch after placement:
Select the component by clicking it.
Click and hold the snap point, and then drag in the direction you would like to stretch the component.
An input box appears with the component's permitted widths (see Figure 2). Drag to the desired width or use the SPACE BAR to move between the values and to finally select.
Release the mouse button.
![]()
Figure 2
Method 2 – Stretch during placement:
Pick a component and move it to the drawing area.
Continue to hold down the mouse button and drag it in the direction you would like to stretch it. Note that you can only stretch the component's width using this method.
An input box appears with the component's permitted widths. Drag to the desired width or use the SPACE BAR to move between the values and finally select the desired one.
Release the mouse button.
Stretching or shrinking a component by height must take place in 3D after the component has been placed:
Click and drag the yellow cylinder in the direction you would like to stretch the component.
An input box appears with the component's permitted heights. Drag to the desired height or use the SPACE BAR to move between the values and finally select the desired one.
Release the mouse button.
The Sideways and the Group options (see Figure 3) enable stretching multiple components by height at the same time:
Sideways – Allows you to adjust the height for all components on the same side as the selected component. Note, after tabbing down to this option and then using the SPACE BAR to activate it, tab back up to the height values and use the SPACE BAR to select a height for all components on that side.
Group – Allows you to adjust the height for all components in the group. Note, after tabbing down to this option and then using the SPACE BAR to activate it, tab back up to the height values and use the SPACE BAR to select a height for all components in that group.

Figure 3
|
Note: Sometimes stretching of a group of components be symbolised by arrows instead of the alternatives Sideways and Group (see Figure 4). Click the cylinder and stretch to the desired height.
Figure 4 |
Stretching or shrinking by depth must take place after the component has been placed:
Select the component by clicking it.
Click and drag the yellow cylinder in the direction you would like to stretch the component.
An input box appears with the component's permitted depths. Drag to the desired depth and release the mouse button.
|
Note: Certain components have a predetermined maximum limit for stretching and a minimum limit for shrinking, according to built-in properties. Other components can be stretched over the entire drawing area. Stretching and shrinking use different measurement units for different components. |