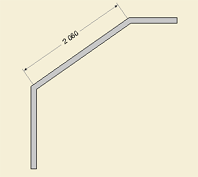

You can set dimensions anywhere in a drawing. Diagonal dimensioning is for walls or other components with a pitch (see Figure 2). Vertical and horizontal dimensioning is for vertical or horizontal components.

Figure 1
Diagonal, vertical and horizontal dimensions are positioned in the drawing area in the same way.
Follow these steps:
Pick one of the three dimensions under Dimensions and leaders in the Tools component tab (see Figure 1).
Move the mouse pointer to the end of the component you wish to dimension and click.
Now move the mouse pointer to the other end of the component and click.
Determine the dimension's position by moving the mouse pointer to the desired side of the component.
Specify the distance between the component and the dimension in the input box.
Lastly, click the dimension into place (see Figure 2).

Figure 2
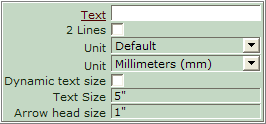
Select the dimension after placing it in the drawing area. An input box opens with the following options (see Figure 3 below):
Text: You can add text to the dimension. Enter the text in the Text input field.
2 Lines: Mark the 2 Lines check box if you would like to have the dimension and text on different lines.
Unit: Choose desired dimensioning unit in the drop down menu. The dimensioning unit set in the control panel is always set as default.
Unit: You can include an additional dimensioning unit. Select desired dimensioning unit in the drop down menu.
Dynamic text size: If the Dynamic text size check box is selected, the dimension and text will change size depending on the zooming view.
Text size: Enter desired font size (this option is only available when the Dynamic text size check box is unselected).
Arrow head size: Choose how big the arrow heads should be by entering a value in the input field.

Figure 3
|
Note: You can change several dimensions simultaneously. Select all the dimensions you wish to be changed and edit the properties. |