
The tool Text tool (see Figure 1) is used for entering static text in the drawing. It can be manually changed at any time and will appear on the printout. The text is placed independently in the drawing area.

Figure 1
To adding text to the drawing area, follow these steps:
Select the Text tool from the Create print template component tab.
Click the text box into the desired position in the 2D drawing area.
In the input box that appears, set the desired text box properties.
Release the mouse button. The Text dialog box opens.
Click in the white text field and type in your text.
Save the text as a text file by clicking the Save button, if you expect to use it again.
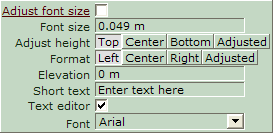
To edit the text, select the text box and select desired options in the input box that appears (see Figure 2).

Figure 2
You have the following options (see Figure 2 above):
Adjust font size: Mark the Adjust font size check box to adjust the size of the text to the size of the text box.
Font size: Enter desired font size (this option is not available if the Adjust font size check box is selected).
Adjust height: Decide how the text shall be positioned in the text box.
- Top: Align the text to the top of the text box.
- Center: Align the text to the center of the text box.
- Bottom: Align the text to the bottom of the text box.
- Adjusted: Justify the text to the same height as the text box.
Format: Decide how the text shall be positioned in the text box.
- Left: Align the text to the left in the text box.
- Center: Align the text to the center of the text box.
- Right: Align the text to the right in the text box.
- Adjusted: Justify the text to the same width as the text box.
Elevation: Change the elevation if you for example would like to put a text box above a table.
Short text: Displays the text in the text box. If you have entered a short text in the text box and would like to do small modifications, you can edit the text in the Short text input field.
Text editor: Mark the Text editor check box to open the Text dialog.
Font: Choose font for your text in the drop down menu.
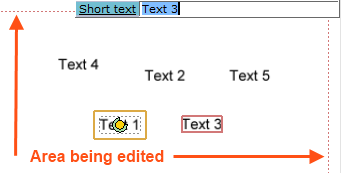
With the Quick text editor you can rapidly switch between, and edit, multiple texts. You can cycle through all visible text boxes in the 2D view or Paper view by pressing the TAB key on your keyboard. You can use the arrow keys to navigate inside a text box, and the Enter key to create line breaks. This tool is accessed from the Tools component tab or by double-clicking on a text box in the current view.

Figure 2: The Quick text editor tool.
To edit texts with the quick text editor, follow these steps:
Click the Quick text editor icon on the Tools component tab, or double-click on a text box in the current view.
Click either a Text or a Label in the 2D view or the Paper View. A red dotted box indicates that you are in edit mode.
Use the TAB key to move from text to text. You can change the text in the Short text box in the upper right corner.

Figure 3: Quick text editing.
Note:
|