
There are several possibilities to make detailed changes to the various parameters that make up an image's total lighting.
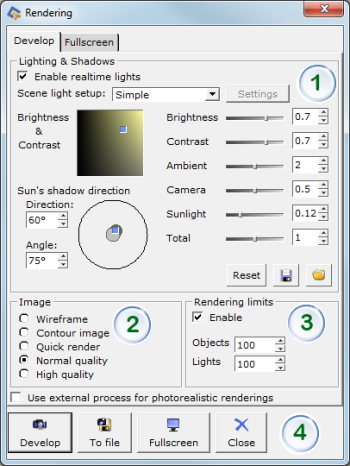
The Rendering dialog box is accessed by clicking ![]() on the 3D view toolbar. Here you can make a number of settings (see Figure 1). Read more about each section by clicking the links below:
on the 3D view toolbar. Here you can make a number of settings (see Figure 1). Read more about each section by clicking the links below:

Figure 1
Lighting and shadows |
In the Lighting and shadows field, you can make the following settings:
Enable realtime settings: If the check box has been selected, the changes you make are automatically updated in your drawing. Remember that this is very resource demanding and that it can slow your computer down if working on large drawings.
Scene light setup: From the Scene light setup drop-down menu you can choose between predefined light setups. The difference is number and type of light sources. The selection depends on which Extension you are currently using.
Brightness & Contrast: An easy way of changing an image's lighting is to adjust the settings for brightness and contrast. This is done by either moving the blue square around in the Brightness & Contrast field, or by moving the two corresponding sliders to set specific numerical values.
Ambient, Camera, Sunlight and Total: By moving the sliders for these settings, you can gradually change the image's lighting to achieve the desired effect.
Sun's shadow direction: You can simulate the light at different times of the day by adjusting the sun's shadow direction and the sun's angle above the horizon. You can either specify numerical values for Direction and Angle, or stretch and turn the blue square in the circle.
Reset: Click this button to reset all settings to default.
Save: Click this button to save your lighting settings to file.
Open: Click this button to open a saved lighting setting.
Image |
In the Image field, you can select the quality for your rendered image. The following options are available:
Wireframe: Black and white cross-section.
Contour image: Black and white contour image.
Quick render: A quick preview of what the image will look like when rendered.
Normal quality: Generates a rendered image with good quality.
High quality: Provides a high-quality image.
Rendering limits |
In the Rendering limits fields, it is possible to set how many components and lights you wish to render. Choosing not to render the complete drawing reduces the rendering time significantly. When you choose to render a specific number of objects, it will automatically be the ones closest to the camera that are rendered.
Objects: Set a value for how many objects that should be rendered.
Lights: Set a value for how many lights that should be rendered.
After making your selections |
When you are satisfied with your settings, you can choose one of the following options:
Develop: Renders an image in the 3D view according to the settings made in the Image field.
To file: Enables you to save your rendering to file.
Fullscreen: Opens the 3D view in a fullscreen mode.
Close: Closes the dialog box.
Read more
|
Note:
|