
There are two ways to transfer drawings to the paper view from the 2D or 3D drawing area. You can either use the feature Send to paper view or View port 2D, respectively View port 3D. Read more about the features below.
![]()
Figure 1
To transfer an entire drawing, or a part of a drawing, to the paper view using the function Send to paper view, follow these steps:
Click the icon Send to paper view in the menu bar of either the 2D or 3D drawing area (see figure 1).
Move the mouse pointer to the 2D or 3D drawing area. A blue rectangle follows.
Click in the drawing area once to set the starting point.
Move the mouse pointer diagonal over the area you wish to transfer to the paper view and click when the rectangle covers the desired area. The selected area is now visible in the paper view.
Note:
|
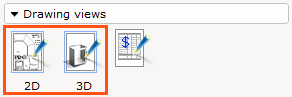
Figure 2
To transfer a drawing to paper view by using the functions Viewport 2D, respectively Viewport 3D, follow these steps:
Go to the paper view and to Tools in the component area.
Click on either the icon Viewport 2D or the icon Viewport 3D in the Drawing views field (see figure 2), depending on if you wish to transfer your drawing from the 2D or the 3D drawing area.
Move the mouse pointer to the sheet area. A blue rectangle with dotted lines follows.
Click once on the sheet to set the rectangle's starting point.
Move the mouse pointer diagonally across the sheet until the rectangle's size corresponds to the size that you wish the copy of your drawing to be.
Click once. A copy of your drawing is now inserted on the sheet. If there are selected components in the 2D or the 3D view the drawing will be displayed within the rectangle so those components are shown. If no component is selected in the 2D or the 3D view the drawing will be displayed so all components are shown in the rectangle.
Note:
|