![]()
![]()
In the Standard - Print Settings dialog, you choose printing settings and finally print the desired drawing layout and lists.
You can open the print dialog in a number of different ways:
Choose Print from the File menu.
Click on the Print button on the toolbar.
Use the shortcut key Ctrl+P.
From the Print Frame component on the Tools tab.
Click here to view the dialog.
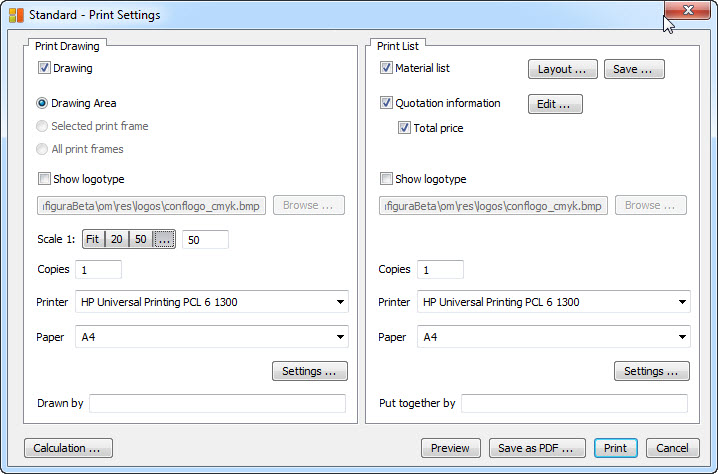
The dialog is divided into two main fields, the Print Drawing field and the Print List field. You can choose to print out the drawing together with the list/-s or to print one item at a time. If, for example, you only want to print a material list, you uncheck the Drawing box in the Print Drawing field and check the Material list box in the Print List field.
In the Print Drawing field, check the Drawing box to print your drawing layout. In the same field, you can also use the radio buttons to choose whether you want to print:
Drawing area
Selected print frame
All print frames
If you choose Drawing area, you will print everything in the drawing area.
The Selected print frame option is only activated if there is one or several print frames on the drawing area. Choosing this option will print out the contents of the print frame (the Print frame is on the Tools tab).
If you choose All print frames, you will print all the print frames in the drawing area. This option is only activated if there is one or several print frames on the drawing area.
In order to insert a company logotype on the drawing, select the Show logotype checkbox.
Proceed as follows:
Click the Browse button to select the file that you would like to insert.
Select the file and choose Open.
Click on the Preview button to see the result.
|
Note: Configura can only insert logotypes that are in bitmap format (.bmp). |
In the Scale 1 box, you can enter a scale for your printout. If you click the Fit button to the left, the program will automatically adjust the drawing scale to the components in the drawing area. The two other buttons, 1:20 and 1:50, allow you to choose between two exact scales. Other scale sizes can be typed into the text field to the right. However, in order to activate the text field in which you can enter the desired scale, first click the "..." button.
|
Note: You can only choose Scale if you have chosen the Drawing area option. When you have a print frame, you set the scale for this individually. |
In the Copies box, you can choose how many copies you want to print.
If you click on the Printer button, you open the Windows Print Setup dialog where you specify the printer setup.
In the Drawn by box, you enter the name of the person who created the drawing.
The button in the lower left-and corner opens the Calculation dialog normally accessed from the Company menu.
In the Print List field, selecting the Material list checkbox will activate the two buttons Layout and Save .
If you click the Layout button, the dialog Standard - Material List Layout will open. Here you can check the boxes corresponding to the headings and fields that you want to include in your print-out. You can also deselect the checkboxes for information that you want to exclude.
The dialog Standard - Material List Layout is divided in two main fields; General Fields and Summing-Up Fields. The general fields appear at the top of the material list when printed out. The summing up fields are related to the total price and appear in the lower left corner of the material list. When you have made your choices in the dialog, click OK or Apply to confirm them.
To the right of the Layout button in the print dialog you will find the Save button.
Follow these steps to save the material list as a text file:
Click the Save button. The Save As dialog will appear.
Select the folder in which you want to save the material list, name the file and click Save.
By selecting the Quotation information checkbox, you activate the Edit button. Clicking the Edit button will open the dialog Standard - Edit Quotation Information. Here you enter all the information that you want to appear in your quotation. When you have entered the desired text in all the fields you want to include in the printout, click OK or Apply.
By selecting the Quotation checkbox, you activate the following options regarding the quotation printout:
If you want the total price shown on the quotation, select the Total price checkbox
In order to insert a company logotype on the quotation, select the Show logotype checkbox.
Proceed as follows:
Click the Browse button to find the file you would like to insert.
Select the file and choose Open.
Click on the Preview button in order to see the result.
|
Note: Configura can only insert logotypes that are in bitmap format (.bmp). |
In the Copies box, you can choose how many copies you want to print.
If you click on the Printer button, you open the Windows Print Setup dialog where you do your printer setup.
In the Put together by box, you enter the name of the person who created the drawing.
At the bottom of the Standard - Print Settings dialog, you will find the following buttons: Preview, Save as PDF, Print and Cancel.
Preview shows you what the printout will look like, on the basis of the settings you have chosen.
Save as PDF allows you to save the file in PDF format. To open a PDF file, you need Adobe Acrobat Reader. You can download Acrobat Reader from the Adobe web site.
Print prints out the drawing you selected.
Cancel closes the dialog.
|
Note: To create a PDF document, special Adobe fonts are required. Configura will create these fonts automatically the first time you create a PDF document in the program. This process is necessary in order to get a correct PDF appearance and must not be interrupted. When updating Windows fonts, Configura will automatically create the equivalent Adobe fonts for these. |