
On the Image tab (see Figure 1) you can change the size, format and resolution etc, and therefore the quality, of your developed images.
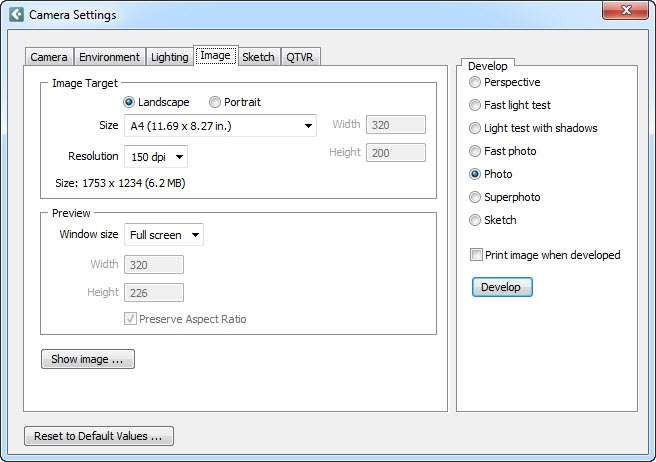
Figure 1 - The Image tab
The image target is the image for which you have a specific purpose in mind, for example sending by email or printing out. Before you choose the image target settings, you must decide what you are going to use the image for. The size, resolution and the resulting quality of the image are all closely linked with purpose for which the image will be used.
The quality of the image depends on:
Selected developing option
Size and resolution
Image format (JPG, TIF etc.)
Each time you develop an image, it is saved on your PC's hard disk. The image information which is saved is determined by the settings you choose in the Image Target field.
In the Image Target field, using the Landscape and Portrait buttons you can choose the orientation of the image about to be rendered.
In the drop-down list under the heading Size you enter the size (in pixels) of the image you want to save. However, this size has no relation to the size of the printed image. The item at the bottom of the list is Input. If you choose Input the two text boxes Height and Width will appear to the right of the list. Here you can enter the size of the image target in pixels.
Resolution concerns the quality of the image and how much memory the image will need. You can choose between 72, 100, 150, 300 and 600 dpi (dots per inch). The larger the number of dots per inch, the better the quality of the image and the more memory it will need. You can only specify the resolution for the following developing options: Fast photo, Photo and Superphoto. Remember that a big size, for example A2, together with a high resolution, say 300 dpi, results in an image that uses a lot of memory.
The text below the Resolution drop-down list shows the size of your image in pixels and the amount of memory it needs (this applies to BMP format).
|
Note: The Size information (in KB or MB) applies to the BMP format. If you save your image in another image format, the size will be different. However, the number of pixels shown, for example 1748 x 1234, applies to all image formats. |
In the Window size drop-down list in the Preview field, you can choose the size of your preview window (this applies only to the preview image and has nothing to do with the settings in the Image Target field). The options are Small, Full screen or Input. If you choose Input, you can enter the number of pixels in the Width and Height text boxes, to specify the size of the image yourself. You can also choose to retain the proportions of the image by checking the check box Preserve Aspect Ratio.
Using the Show image button, you can view the image you have just developed. If you click on this button, but have not developed an image, the window which appears will be empty.