
You can change the settings for doors after you have placed them in the drawing area.
In order to change a door in the drawing area, follow the instructions below:
Right-click on the desired door. A menu is displayed.
Choose Settings from the menu. The Settings dialog box is displayed.
The Settings dialog box for a door has three main tabs: General, Door and Details.
In the Simple Lines field, in the Line type drop-down list, you can change the type of line used to outline a door. Using the Width field, you can choose the width of that line.
In the 3D field, in the Height box, you can alter the height of the door in 3D. In the Distance to floor text box, you change the distance between the door and the floor.
In the Draw Order field, you can determine the order in which the selected door should be drawn in 2D (i.e. what layer it should be in). By dragging the slider to the maximum level, the door will end up on top of all other components. By dragging it to the lowest level, it will be shown beneath other components.
In the General field, you change the width of the door in the Width box.
In the Depth box, you change the depth of the door (the same as the thickness of the wall).
In the Angle 1 field, you choose how far open the door should be. If you have selected a Double door, it is possible to set the angle for each door (i.e. both the fields Angle 1 and Angle 2 are activated).
In the Type drop-down list, you can change the type of door. Standard is a normal door, Rectangular opening is an opening without a door or doorcase. Panels and Glass Panels means a door with a number of inset panels, the latter having glass panels.
In the Handle drop-down list, there are four different choices: Standard, De Luxe, Knob and None.
You use the Change door side button to choose which direction the door should open in.
Hinge side can be altered by using the Change hinge side button.
In the Standard Door field, in the Thickness box, you can change the thickness of the door. Check the Doorstep check box, if you want a doorstep.
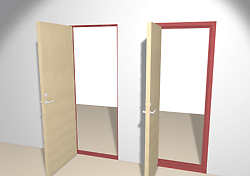
In the Outer Frame Width field, in the At door text box, you enter the width of the frame round the door, as seen from the front. In the Behind door text box, you enter the width of the frame, as seen from behind. In Figure 1 the frame width of the left door At door is 10 mm and Behind door 20 mm. For the door to the right the frame width At door is 50 mm and Behind door 75 mm.

Figure 1
When you have made the desired changes, always confirm with OK or Apply.