
The sun can be used as an indirect (by shining through a window) or direct light source.
|
Follow the instructions below, to use the sun:
|
 |
|
Note:
|
You can point the sun after you have positioned it in the drawing area.
Follow the instructions below:
Make sure that the sun is activated, by clicking on it. A snap point appears over the sun's directional arrow.
Click on the snap point and turn the sun in the direction you want.
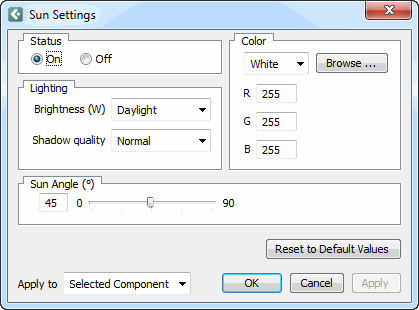
 By double-clicking on the sun, or by right-clicking and choosing Settings from the pop-up menu, you open the dialog Sun Settings. In this dialog you can turn the sun on and off, adjust the brightness of the light and change the angle of the sun rays.
In the Status field, you can turn the sun on or off using the radio buttons On and Off.
In the Lighting field, you can change the brightness and the quality of the light. In the Brightness drop-down list, you can choose between Daylight, Dusk and Moonlight. In the next drop-down list, Shadow quality, you can choose how sharp the shadows on your 3D images should be.
In the Sun Angle field, you can set the angle of the sun rays. The rays can be angled between 0 degrees (horizontal) and 90 degrees (from directly above). Drag the slider or enter a value between 1 and 90 for the angle you want.
In the Color field, you can choose the color of the light from the drop-down list. If you choose Custom from the list, you can either enter values for an RGB color in the R, G and B boxes below, or click on Browse. This opens the Select and Edit RGB Color dialog. See the topic Creating your own RGB Colors.
At the bottom of the Sun Settings dialog is a Reset to Default Values button where at any stage, you can reset the dialog to the default values.
In the Apply to drop-down list, you can choose how many components should be changed.
When you are happy with your settings, click on OK or Apply.