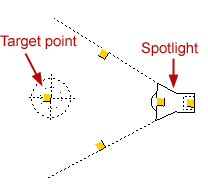

The spotlight can be used as a general or a directional light source. You use the mouse to point the spotlight. You can point it in a different direction, or move it, after you have clicked it into position on the drawing area, but it is easier to position the spotlight, point it and set the distance at the same time.

Figure 1
Follow the instructions below:
Select the spotlight by clicking on it and moving it to the drawing area.
Click the spotlight into position on the drawing area and hold down the mouse button.
Point the spotlight by dragging the mouse pointer in the direction where you want the light to fall, holding down the mouse button. The spotlight's target appears next to the mouse pointer.
Continue to drag the target. Position it on the component you want to light.
Release the mouse button.
Move the mouse pointer outside the drawing area to release the component.
|
Note:
|
You can move the spotlight and its target without the relationship between them changing.
Follow the instructions below:
Click anywhere on the spotlight, except on the snap points, and hold the mouse button down.
Drag the spotlight to the position on the drawing area where you want it. The target will follow.
Release the mouse button.
You can move the target without moving the spotlight. This means that you can move the light from one component to another.
Follow the instructions below:
Make the spotlight activated by clicking on it, if it is not activated already.
Place the mouse pointer over one of the yellow snap points on the target, and click and hold the mouse button.
Drag the target to where you want it to be. You can rotate the target through 360 degrees or move it nearer to or further away from the spotlight.
Release the mouse button.
You can move the spotlight without moving the target. This means that you can make the light shine from a different direction, and that you can move the light source nearer to the component which it is lighting.
Follow the instructions below:
Make the spotlight activated by clicking on it, if it is not activated already.
Click on one of the spotlight's snap points (see Figure 1), and click and hold the mouse button.
Drag the spotlight to the position where you want it. You can rotate the spotlight through 360 degrees or move it nearer to or further away from the target.
Release the mouse button.
You can increase or reduce the width of the beam of light by clicking on one of the wide angle's snap points (see Figure 1) and dragging it inwards or outwards.
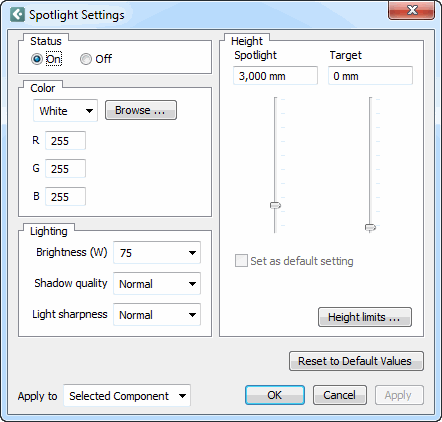
 By double-clicking on the spotlight, you can open the dialog Spotlight Settings. In this dialog you can specify the height and brightness of the spotlight, amongst other things.
In the Status field, you can turn the spotlight on or off using the radio buttons On and Off.
In the Color field, you can choose the color of the light from the drop-down list. If you choose Custom from the list, you can either enter values for an RGB color in the R, G and B boxes below, or click on Browse. This opens the Select and Edit RGB Color dialog. See the topic Creating your own RGB Colors.
In the Lighting field, you can affect the strength, quality and sharpness of the light. In the Brightness (W) drop-down list, you can choose the strength of the spotlight (5-4000 watts). In the next drop-down list, Shadow quality, you can choose how sharp the shadows on your 3D images should be. In the lower drop-down list, Light sharpness, you can choose the sharpness of the light.
In the Height field, you can adjust the height of the Spotlight and the Target. Drag the sliders or enter the height you want in the text boxes. If you click on the Height limits button, you open the dialog Height Limit Settings. In this dialog, you can set the upper and lower limits for the height of the spotlight.
Tip, you can decide which height that should be the default height of the spotlight and target. When you have set desired height, select the checkbox Set as default setting. If you set the default height to the standard ceiling height, the spotlight will automatically be placed in the ceiling next time you place it in the drawing area.
At the bottom of the Spotlight Settings dialog is a Reset to Default Values button where at any stage, you can reset the dialog to the default values.
In the Apply to drop-down list, you can choose how many components should be changed.
When you are happy with your settings, click on OK or Apply.