
Regardless of which graphics mode Configura runs in, it is possible to allocate image rendering to a separate render server, which has several advantages:
The rendering takes place in a separate process, in its own window, you can continue working in Configura while your rendering is being processed.
The rendering will continue even if you close the Configura main window.
Since the advanced graphics engine is utilized, the image displays a higher sense of realism with improved light and shadow nuances and more advanced graphics settings.
Here is an overview to show the default setting for the different ways of rendering available in Configura:
Way of rendering |
Default setting |
Auto 3D (Preview) and Auto3D (Detailed) buttons in the toolbar |
Render server (can however be changed to the Old Render Engine in the Control Panel) |
Render buttons in Configura Walkthrough |
Render server |
Right-click on camera and select Develop |
Render server |
Right-click on camera and select Develop (Old engine) |
Old process (simple graphics engine) |
Develop button in the Camera Settings dialog |
Old process (simple graphics engine) |
Develop icon in the Camera View |
Old process (simple graphics engine) |
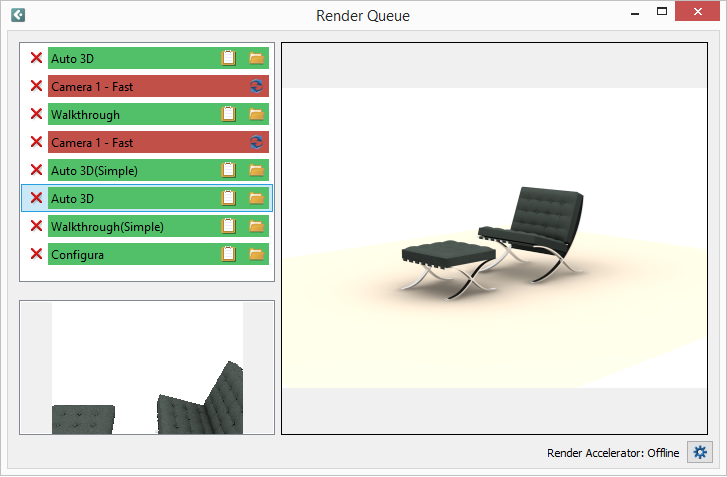
Whenever a render task is sent to the render server, the Render Queue window opens. At the bottom left, is a preview of the current render job. The right part of the window is a viewing area where the image that you have selected in the list to the left is shown:

Green colored rows indicate that the rendering was successful and that the image is finished, while red color indicate that something went wrong during rendering. To try again, you can either right-click and select Retry, or click the icon to the right on a red row.
Each green row in the list has two icons to the right. The leftmost icon is Copy to clipboard, and the rightmost icon is Open containing folder. Each item can also be easily removed with the red removal X.
|