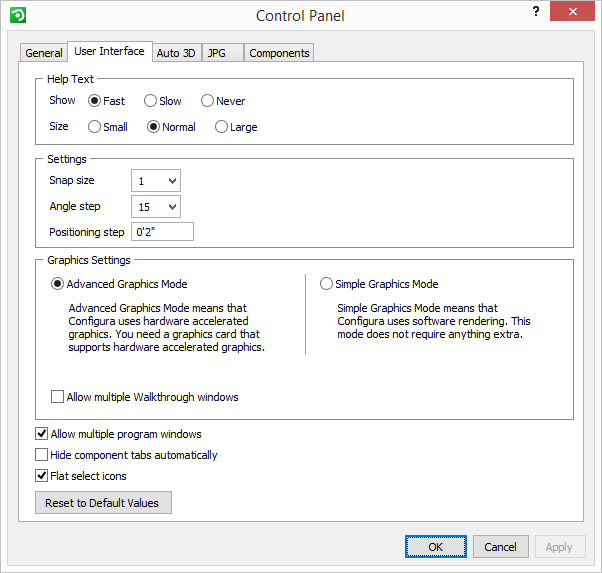

The User Interface tab in the Control Panel contains three main fields: Help Text, Settings and Graphics Settings.

Figure 1: The Control Panel's User Interface tab.
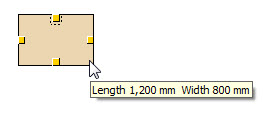
Help text is displayed in a light yellow box (Figure 2) when you move the mouse pointer over a component. It contains information about the current component, for example its dimensions. Using the different radio buttons, you can choose whether you want help text to appear when you move the mouse pointer over a component, and if you do, how quickly it should be displayed. If you choose Fast, the help text is displayed immediately. If you choose Slow, the text is displayed after a delay of a few seconds. Choose the option Never, if you do not want the help text to be displayed at all. You can also choose whether the help text should be Small, Normal or Large.

Figure 2
In the Settings field, you can change the Snap size. "Snap" refers to snap points, which are the yellow triangles or squares which appear on a component when it is activated. You can choose between eight different sizes for the snap points. The smallest size is ½ and the largest is 3.
Angle step is the size of the angle step a component takes when you drag to rotate it. Select the desired value in degrees.
Positioning step is the size of the step a component takes when you move it in the drawing area by means of the arrows on the keyboard. Select the desired value in millimeters.
InstantPlanner defaults to using the advanced graphics engine, but if you wish to switch to the simple graphics engine while running InstantPlanner, you can do this in the Graphics settings field.
Here, you can also allow multiple Walkthrough windows. System default is to only allow one walkthrough at a time.
Leaving this box checked, which is the default setting, means that a new InstantPlanner window will open each time you open a drawing from Windows. If the box is deselected, it will trigger InstantPlanner to try to reuse the same window each time you open a drawing from Windows.
Checking the box Hide component tabs automatically, you can make the drawing area larger. The gray component tabs on the left-hand side of the drawing area disappears to the left. However, it will re-appear temporarily if you move the mouse pointer to the tab row.
Unchecking the Flat select icons box, will allow you to go back to the old program icons, i.e. to when their appearance on the tabs was slightly raised and more "button-like".
At the bottom of the dialog is a Reset to Default Values button where at any stage, you can reset the settings on the tab to the default values.