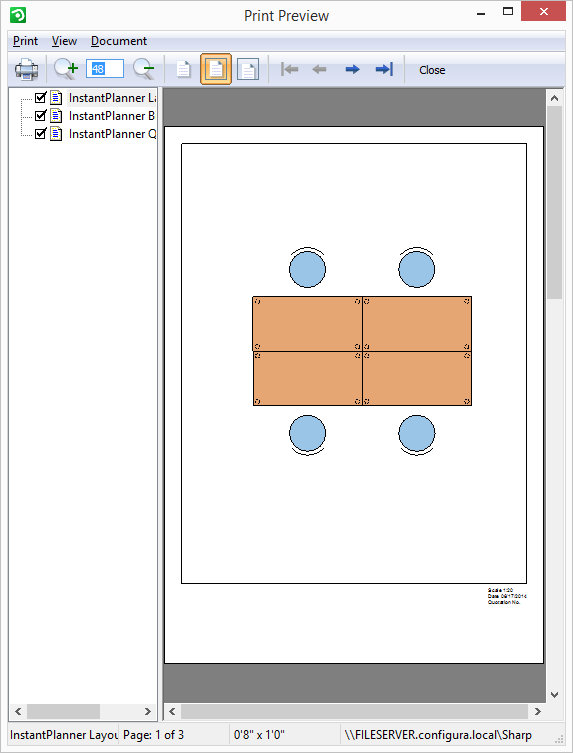

In the Print Preview window, you can see what your printout will look like. To open the preview window, click the Preview button in the InstantPlanner Printouts dialog.

In the print preview window you can navigate through the pages in four different ways:
Click on the desired page in the tree view located in the top left of the window.
Open the Document menu and choose First Page, Previous Page, Next Page or Last Page.
Click on one of the four arrows located in the toolbar at the top of the window.
Use the following keys on your keyboard: Home for first page, Page Up for previous page, Page Down for next page and End for last page.
To zoom in and out in the preview window you can:
Open the View menu and choose to Zoom In or Zoom Out.
Use one of the two magnifying glasses with plus and minus signs on the toolbar.
Enter a number, representing percentage of the original size, in the text-field located between the magnifying glasses.
Open the View menu. Choose Actual Size, Fit Page or Fit Width.
Use the shortcut buttons, located to the right of the magnifying glasses, to choose Actual Size, Fit Page or Fit Width.
You can print directly from the preview window by choosing Print in the Print menu. You can also click the toolbar button with a printer symbol on it.
At the bottom of the print preview window there are four fields which provide information on the current selections in the preview.
From left to right, these are:
The name of the selected page in the document
The number of the selected page and the total number of pages
Current paper size (depending on your current printer settings)
Selected printer for the document
The window can be closed by choosing Close in the Print menu or by clicking the Close button at the very right of the toolbar.