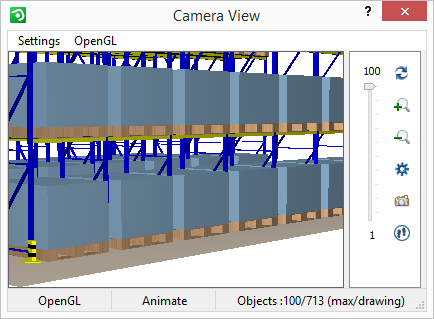

In the Camera View you can display a 3D image at the same time as you are working in the drawing area. The Camera View has two display options, a standard, black-and white mode and the colored three-dimensional Open GL mode. The window opens automatically when you position the camera on the drawing area. If the Camera View window disappears, double-click on the camera to open it again.

The camera view has a menu bar with two menus: Settings and Open GL. Below the menu bar is the window area where you can see the contents of the drawing area in 3D. On the right-hand side of the window are a slider and five buttons. At the bottom of the window is the status bar, which displays the settings you have chosen for the camera view.
On the Settings menu, there are four options which you can check:
Open GL: If Open GL is not checked, then Animate is grayed out and cannot be chosen. In this situation, which is called Standard (you can see this in the status bar), the camera view displays a simplified perspective image which shows only the contours of the components on the drawing area. When Open GL is checked, you will see a high quality color image with relatively sharp contours. For example, you can see immediately the effects of changes in colors and materials.
Software: The Software option has to do with the rendering of the camera view. As a default, the OpenGL color image in the Camera View is rendered with software that is built in to the program. Software rendering is stable and safe, however, it demands a great deal of power from the processor. If you feel that the rendering time in the camera view is very slow when OpenGL is turned on, it might be a good idea to instead try the alternative - hardware rendering. This is done by unchecking the Software alternative in the Settings menu in the camera view. Then, in order for the new setting to be activated, the program has to be restarted. Hardware rendering speeds up the animation and OpenGL rendering in the preview window.
Animate: If you have selected Open GL, you can also choose to check Animate. Animate allows you to see changes in perspective immediately when you move the camera or the camera's target. This means that you can see the movement of the camera. When Animate is not checked, you can only see the changes after the camera has moved.
Preserve Aspect Ratio: With Preserve Aspect Ratio checked, the camera view will always maintain the correct proportions, that is, the camera view will always show the same as a developed image.
On the Open GL menu, there are three quality options: High (slower), Medium and Low (faster). Choose one of the options. High takes longer to develop, Medium is a little faster and the fastest of all is Low.
|
Note:
|
On the right-hand side of the Camera View there is a slider bar and a number of buttons:
By dragging the slider, you can choose how many components are displayed in the camera view.
Using the Re-render with current objects button, you can refresh the image in the camera view window. You can also do this by clicking on the camera and moving it slightly.
Using the Zoom in and Zoom out buttons, you can magnify one or more components in the camera view.
Using the Camera Settings button, you open the Camera Settings dialog.
Using the Develop button, you can develop an image. The image is developed with the developing option you most recently used in the camera dialog.
Clicking the Create 3D Walkthrough lets you initiate a 3D walkthrough from the camera's position.
|
Note:
|