
All examples below are based on the Selective Pallet Racks products. The basic principle for your work in the administrative remains the same, when working with either pallet racking or shelving.
When opening the Administrative Tool dialog, at the top, Selective Pallet Racks is pre-selected in the Product Range choice. This means that all the settings below in the dialog apply to pallet racks and that Uprights and Beams are the two main tabs that you can choose between.
The Uprights tab together with the Part Number tabs are pre-selected. This is where you specify the available upright dimensions for the product series that you would like to create. In order to specify the dimensions of the beams, select the Beams tab and create the appropriate entries. When all of the information has been entered in the administrative tool and the new product series is saved, it will appear as an option in the Product Series choice on the Selective Pallet Racks component tab.
In order to create a product series for Selective Pallet Racks, proceed as follows:
Select Selective Pallet Racks in the Product Range choice.
In the Company and Product Series fields, enter the desired information.
In the dialog's File menu, select Save Product Series or click on the Save button.
Click the arrow to the right of the drop-down list next to the Currency heading to select the desired currency.
Click the arrow to the right of the drop-down list next to the Weight Unit heading to select the desired weight unit.
Click the arrow to the right of the drop-down list next to the Color heading to select the desired upright color.
Enter the Upright Dimension (i.e. the thickness of the upright).
To the right of the Design heading, click on the image to display a drop-down list with different upright designs. Select the desired design by clicking on the corresponding image.
Move down to the Part Number tab. In the table below, in the blue area of the vertical Type column, start entering the desired descriptions for the different upright types. Confirm each input by pressing Enter.
To the left, in the blue area of the vertical Depth column, enter the desired values for the different upright depths. Confirm each input by pressing Enter.
In the blue area of the horizontal Height row, enter the desired values for the different upright heights. Confirm each input by pressing Tab.
Now in the white fields, start entering the corresponding part numbers, see Figure 1 below. Confirm each input by pressing Enter or Tab.
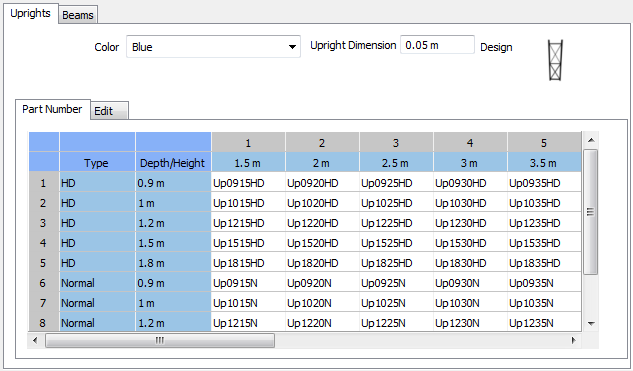
Figure 1: Example of the administrative tool.
|
Note:
|
When you have finished entering values for the Uprights, select the Beams tab.
Click the arrow to the right of the drop-down list next to the Color heading to select the desired beam color.
Move down to the Part Number tab. In the table below, in the blue area of the vertical Type column, start entering the desired descriptions for the different beam types. Confirm each input by pressing Enter.
To the left, in the blue area of the vertical Dim (Dimension) column, enter the desired values for the different beam dimensions. Confirm each input by pressing Enter.
In the blue area of the horizontal Length row, enter the desired values for the different beam lengths. Confirm each input by pressing Tab.
Now in the white fields, start entering the corresponding part numbers, see Figure 2 below. Confirm each input by pressing Enter or Tab.

Figure 2: Example of the administrative tool.
When you have finished entering values for both the uprights and the beams in that product series, save it by selecting Save Product Series in the dialog's File menu, or by clicking on the Save button.
|
Note:
|