
In order to create a push-back rack using a product series in InstantPlanner, proceed as follows:
Select the desired product series from the drop-down list at the top of the component tab.
Select the Design Specifications button to open the dialog box. The Product Series tab is pre-selected. In the General Options field, select Push-back as system type. Selecting the push-back option enables you to set the slope of the push-back beam.
Go to the System & Buffer Type field. Two options are available: Auto Max-Slope (takes the weight per pallet into account and automatically calculates the recommended beam slope) and Custom Slope (allows you to specify exactly).
Clicking on the Custom Slope button will activate the option below, Push-Back Rail Slope. Enter the desired value as a percentage. Figure 1 below shows a push-back rack with a 10 % beam slope.
Proceed with your settings in the Product Series tab.
Select the Advanced tab and do the desired settings.
Confirm your settings and close the dialog by selecting OK.
Do the rest of the settings on the Drive-In/Push-Back tab.
Design your system by placing the Rack component directly in the drawing area. You can stretch it in width whilst positioning it. The system can also be stretched in depth after placement in the drawing area. An elevation view is added automatically.
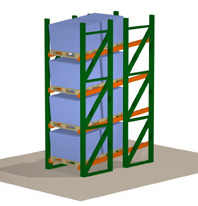
Figure 1: Example of a Push-Back system.
|
Note:
|