
It is possible to export drawing information from InstantPlanner to other file formats, such as EMF and the Cad formats dwg and dxf.
On the Import and Export tab, the Export Drawings section contains the following features to enable this export:
Export Drawing to Cad (dwg/dxf)

EMF stands for Enhanced Metafile and is a Windows format. Clicking on the button Export Drawing to EMF, means that you can export a drawing or part of a drawing to, for example, Microsoft Word.
To export to EMF, follow the instructions below:
Click on the button Export Drawing to EMF. The dialog EMF (Enhanced Metafile) Export Settings is displayed.
In the File field, click on Browse to select a file destination, name the file and click on Save.
In the Area field, you can choose whether you want to export the Whole drawing or a Selected group on the drawing.
In the Format field, you can choose from a number of different formats in the drop-down list. Using the radio buttons Landscape and Portrait, you can choose the orientation of the drawing.
Click on OK or Cancel.
To open the exported image, for example in Microsoft Word, follow the instructions below:
From the Insert menu in Microsoft Word, choose Picture and From File.
Go to the right folder. Select the EMF file and click on Insert.
In order to export a InstantPlanner drawing to one of the Cad formats dwg or dxf, the drawing has to have a Cad zero point (a starting point that determines the drawing's position in the drawing area).
InstantPlanner automatically inserts a zero point in the drawing area, if it is missing when the drawing is about to be exported. This can also be done manually.
To do this, follow the instructions below:
Select the Cad zero point (dwg/dxf) component and click it into position on the drawing area. By placing the zero point you have determined its x and y-coordinate. You now have to enter a z-coordinate (the ground level of the drawing).
Double-click on the zero point you have just placed. The Zero Point Settings dialog is displayed.
In the Elevation text box enter a value (negative values are also valid) and click on OK or Apply.
Note:
|
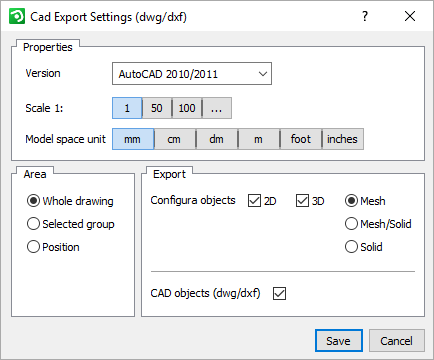
You can export InstantPlanner drawings to the Cad file formats dwg and dxf. By clicking on the button Export Drawing to Cad (dwg/dxf), the dialog box Cad Export Settings (dwg/dxf) is shown.
To export to dwg or dxf, follow the instructions below:
Click on the button Export Drawing to Cad (dwg/dxf). The dialog Cad Export Settings (dwg/dxf) opens.
In the File field, click on Browse to select a file destination, name the file and click on Save.
From the Version drop-down list, choose the Cad version that you want to export to.
In the Properties field, choose the Scale using one of the numbered buttons or click on the button furthest to the right and enter the desired scale in the box. In the same field, also select the desired Model Space Unit.
In the Area field, choose whether you want to export the Whole drawing, selected group or Position.
The Export
field enables you to determine what kind of information you want to
export. Selecting Configura objects
will enable you to export not only the 2D information but also the
3D information in the drawing. For 3D objects (dwg/dxf), there are
three different export options:
- Mesh: exports all 3D objects
as meshes. This is the default setting.
- Solid: this option means
that InstantPlanner
attempts to create solids, which are then included as solid entities
in your .dwg drawing. The drawing can then be loaded into other software
and converted into, for example, a .step file. Whether or not 3D objects
can be converted to solid entities is depending on how the 3D objects
have been implemented in the drawing. In case InstantPlanner
cannot create solids, empty .dwg files may be generated.
- Mesh / Solid: by selecting
this option, InstantPlanner
creates solids when possible, and other 3D objects are exported as
meshes.
You can also choose to export all Cad information in the InstantPlanner drawing by checking the Cad objects (dwg/dxf) box.
Click on OK when you have finished your selections.
Note:
|