
When working with InstantPlanner, the idea is not that you should end up with a large number of elevations in the drawing area.
If you want to have several identical components but want to avoid positioning an elevation for each one, you can proceed with one of the following ways:
In this alternative we will describe how you can put out the required number of 2D components and give just one of the components an elevation. This elevation will then be copied and finally pasted onto the rest of the 2D components.
Example:
You want to position a row of five identical bays and only have one elevation representing all the components in the drawing area.
Follow the instructions below:
On the InstantPlanner main tab, click on the Selective Pallet Racks tab.
Select the Bay component by clicking on it.
Move the component onto the drawing area and drop the bay in the desired position.
In this example, you want more than one bay so continue to click four times, one click for each component. You should now have five bays on the drawing area.
Move the mouse pointer outside the drawing area or press the Escape key to finally drop the component.
Back on the component tab, select the Elevation component by clicking on it.
Move the mouse pointer close to the first bay on the left-hand side in the drawing area. When the Elevation snaps to the Bay component, click it in position.
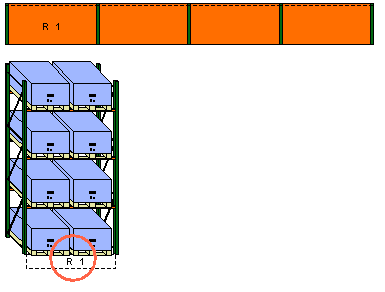
Move the mouse pointer outside the drawing area or press the Escape key to release the new elevation that appears automatically. In the drawing area, you now have five bays with a single elevation (see Figure 1).

Figure 1
Now, in order to copy the elevation, double-click on it. A dashed little rectangle with an "R" inside appears (a copy of Reference 1).
Move the rectangle close to the bay closest to the one that already has an elevation (the second from the left). When it snaps, click to drop it.
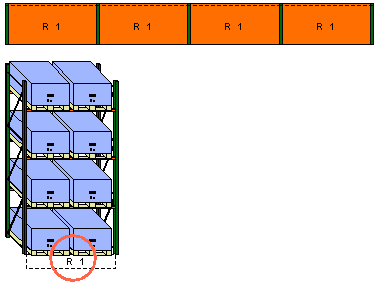
Without leaving the drawing area, go to the next bay and click. Continue until all the bays have references, i.e. are marked with "R 1" (see Figure 2 below).

Figure 2
Here we will describe how you can start by placing only one 2D component on the drawing area and giving it an elevation. The 2D component will then be copied and finally pasted onto the drawing area.
Example:
You want to position a row of five identical bays and have one elevation representing all the components in the drawing area.
Follow the instructions below:
On the InstantPlanner main tab, click on the Selective Pallet Racks tab.
Select the Bay component by clicking on it.
Move the component onto the drawing area and click to drop the bay in the desired position.
Move the mouse pointer outside the drawing area or press the Escape key to drop the component.
Back on the component tab, select the Elevation component by clicking on it.
Move the mouse pointer with the elevation close to the bay in the drawing area. When the Elevation snaps to the Bay component, click to drop it in position.
Move the mouse pointer outside the drawing area or press the Escape key to release the new elevation that appears automatically. In the drawing area, you now have one bay with an elevation.
Right-click on the bay (i.e. on the 2D component) to copy it. A pop-up menu is displayed (see Figure 3).

Figure 3
Choose Copy.
Move the mouse pointer to where you want the copy to appear and right-click. A pop-up menu is displayed.
Choose Paste.
A copy of the bay is shown with the mouse pointer. Allow it to snap to the first bay in the drawing area and click the copy in position.
Continue to click until you have five bays in the drawing area (see Figure 4).
Move the mouse pointer outside the drawing area or press the Escape key to finally drop the component.

Figure 4
Note:
|
It is not very likely, but for some cases you might want to have one elevation for each 2D component. Using Copy and Paste Copies of Elevations, allows you make a copy of the component and a copy of the elevation.
Follow the instructions below:
Position a Bay and give it an Elevation.
Right-click on the bay. A pop-up menu is displayed.
Choose Copy from the pop-up menu.
Move the mouse pointer to where you want the place the copy and right-click. A pop-up menu is displayed.
Choose Paste Copies of Elevations.
A copy appears with the mouse pointer. Click the copy in position where you want it to be placed. When you have clicked and dropped it in position, a new elevation appears. You can position any number of elevations in the drawing area in this way.