
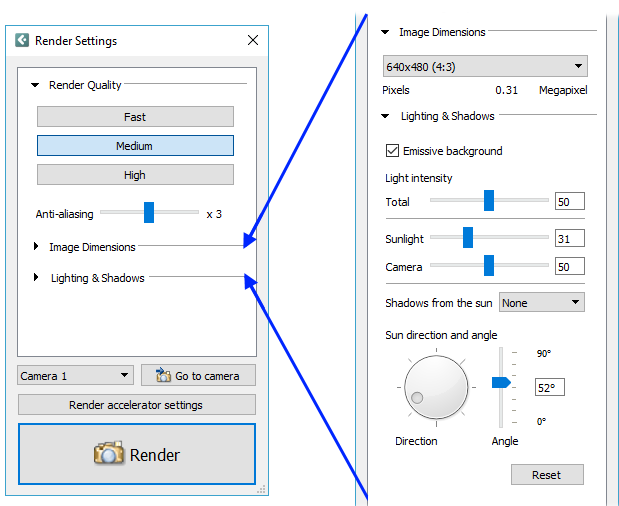
When you pick the Auto 3D (Detailed) button, or right-click on a camera and select Develop, the dialog shown below will open where you can adjust render quality, image dimensions and lighting and shadows before rendering an image:
With regards to the available options in this dialog, we recommend that you always start out with the default settings. They are set to produce a fast quality rendering in a rather small size. Setting the render quality to high, increasing the anti-alias, or - above all - choosing a larger image size will significantly add to the rendering time.
The render settings are automatically saved in the drawing which makes it easier to render using the same settings the next time you, or somebody else, opens the drawing.
|
All three qualities use the render server and will therefore render your image using the render queue window. The differences between Medium and High quality renderings are often very subtle, which means that keeping the Medium option selected is sufficient most of the time.
Using anti-aliasing is a way of making lines and edges look soft and smooth, which adds extra quality to an image.
For the image size, you can choose among some of the most commonly used image formats. In the drop-down menu, you will see information about the size, ratio and number of megapixels for each option. It is also possible to set a custom image size.
Please bear in mind that picking a larger image size is an adjustment that increases the rendering time the most.
Here, you can experiment with different light settings to achieve the result that you want. Note that there is a Reset button at the bottom of the section that resets all changes done in the Lighting & Shadows part of the dialog.
Selecting either the Medium or the High render quality at the top of this dialog will show an Emissive background checkbox in this section. Leaving this box checked, which is recommended in most cases and the default setting, will add a lot of additional light onto the scene during rendering. This is mostly a good thing that contributes to realistic-looking renderings, but open scenes with very bright colors, textures, and models could render too bright. If this is the case, try deselecting the emissive background. Note that if you are working on a closed room with walls and ceiling, the emissive background will have very little or no effect at all. In this situation, you will need to work with other light sources, such as the camera light or the ceiling with integrated lights, to achieve good lighting.
Total: will increase or
decrease the intensity of all light sources in the Render
Settings dialog.
Ambient: this light only becomes available using the Fast rendering option, and then serves as a background light that illuminates everything in the drawing.
Sunlight: controls the simulated sunlight that can be adjusted by altering the direction and angle of the sun further down.
Camera: controls the light that originates from the position of the camera.
Select if you want the sun to cast hard shadows or no shadows at all.
Spinning the Direction wheel will, for example, make the sun shine in through a specific window. Adjusting the Angle lets you simulate the daylight at different times of the day (90 = shining straight down, 40 = mid afternoon etc.).
Note:
|
Further down in the dialog, there is a drop-down menu where all cameras in the drawing are listed. You can select a camera and render that particular one, or click Go to camera to zoom in on that particular camera in the drawing. You can also choose the All cameras option from the list to render all cameras in the drawing at the same time*.
*Please note that this option is only visible when there is more than one camera in the drawing. Rendering all cameras will generate one render job that is sent to the render server, and each camera view will then render as a different frame on the server. This will save time as InstantPlanner would otherwise have to create and transmit the render job multiple times to the render server. Remember, however, that in reality, creating and transmitting the job usually takes considerably less time than the actual render, so the time saved may not really be noticeable. On the other hand, a dedicated render server transmitting over say a wireless network to a separate machine might take a lot of time and bandwidth, thus making the render all option the more important.
When you have made your settings, click the Render button at the bottom to start rendering. This will open the Render Queue where you can follow the progress.