
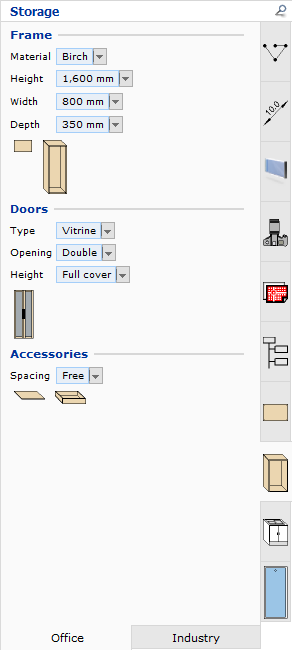
 In InstantPlanner,
those components that have elevations
connected to them are found under Office/Home
on the Storage
tab (see picture to the right). From here and onwards, all descriptions
about elevation views will apply to the cabinets on this tab.
In InstantPlanner,
those components that have elevations
connected to them are found under Office/Home
on the Storage
tab (see picture to the right). From here and onwards, all descriptions
about elevation views will apply to the cabinets on this tab.
A cabinet from the Storage tab is not complete until it has a Base and a Storage Frame (see below).
Base Storage frame
The Base is the main component, which you have to start with. In the drawing area, the base appears as the object would look from above, which is called a plan view (see picture above). When the Storage Frame is added, you have a cabinet that can be viewed in 3D.
To position a base and its elevation in the drawing area, follow the instructions below:
Select the Base component and position it in the drawing area. The base has dashed lines and the cross on the component indicates that it is not complete.
Select the Storage frame component and move it onto the drawing area. When it snaps to the Base, click to position it. The dashed lines on the base are now solid and the red cross has disappeared. Now you have a cabinet.
Continue to add the desired set of doors, shelves or drawers, by snapping them onto the frame.
Note: Under Accessories, you find shelves and drawers. It is possible to either position shelves or drawers freely, or to enter a specific gap between them. To position them freely, select Free from the drop-down list by the Spacing heading. If you want to set a specific gap, select Custom and enter your desired value for the gap, in the white text field to the right. |
Example 1A
To position a cabinet with roller shutter doors in the drawing area, follow the instructions below:
Position the Base where you want it to appear in the drawing area.
Select the Storage frame and click it in position on the base.
On the tab, go to the Doors section. In the drop-down menu next to Type, select Roller Shutter.
Select the roller shutter, which appears below and click it in position in the frame.
When the Base component receives its Storage Frame, it has a front that can be adjusted in different ways. All the front adjustments are made directly in the elevation view. Not only can you now change and add exchange doors and accessories, but also change the height of the cabinet. To be able to do this, activate the frame and drag its topmost snap point height wise (Note: This change needs to be carried out before the doors and accessories have been inserted).
Example 1B
To remove the roller shutter, and instead put shelves in the cabinet, follow the instructions below:
Activate the elevation view, so that its yellow snap points are visible.
Click on the triangular snap point on the Roller Shutter. The roller shutter is removed.
Under Accessories, select the Shelf component and snap it to the cabinet. Click for as many shelves as you want in the cabinet.
Note:
|