
The second option in the Color Model/Type field is Texture (see Figure 1). Textures are images of real materials, for example scanned or digital images of wallpaper, tiles and lino floor coverings. The textures must be stored on your PC or on your company's network in order for you to be able to use them.
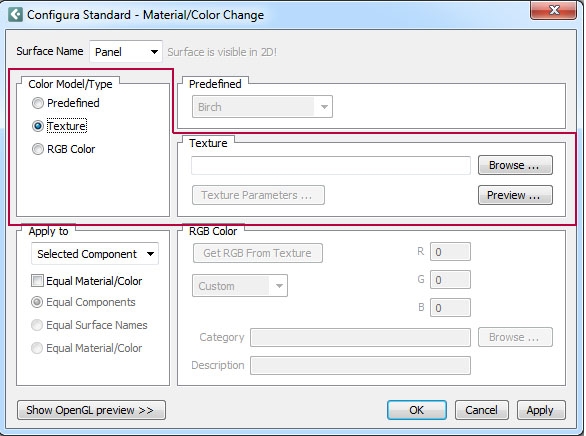
Figure 1 - Texture option
To use textures, follow the instructions below:
Right-click on the component or surface to which you want to apply a texture. A pop-up menu is displayed.
Choose Material/Color from the pop-up menu. The Material/Color Change dialog is displayed.
Select Texture. The Texture field appears to the right in the dialog.
Click on the Preview button in the field Texture. The Texture dialog is displayed.
Click on the Folder button in the top left-hand corner of the dialog. A new dialog appears, in which you can open the folder where your textures are stored.
Choose one of the folders and click on OK in the dialog. The textures in the folder are displayed in the Textures window.
Choose a texture by clicking on one of the images. The image is surrounded by a blue frame.
Click on OK or Apply.
The path for the texture file you chose is displayed in the Texture box.
Click on OK or Apply in the Material/Color Change dialog .
Example:
You want to apply a tile texture to an interior wall. Before you right-click on a wall line, it is important that you position the mouse pointer exactly on the line. You can tell that the mouse pointer is on the line when the line's help text is displayed (Figure 1).
To apply a texture to a wall, follow the instructions below:
Right-click on the line which represents the interior wall. A pop-up menu is displayed.
Choose Material/Color from the pop-up menu. The Material/Color Change dialog is displayed.
Select Texture. The Texture field appears to the right in the dialog.
Click on the Preview button in the field Texture. The Texture dialog is displayed.
Click on the Folder button in the top left-hand corner of the dialog. A new dialog appears, in which you can open the folder where your textures are stored.
Choose one of the folders and click on OK in the dialog. The textures in the folder are displayed in the Textures window.
Choose a texture by clicking on one of the images. The image is surrounded by a blue frame.
Click on OK or Apply.
The path for the texture file you chose is displayed in the Texture box.
Click on OK or Apply in the Material/Color Change dialog .

Figure 1
|
Note:
|
In the instructions above, we used the Preview button in the field Texture in the Material/Color Change dialog. The Preview option takes a little time, as your PC has to process a large quantity of information in order to be able to display the texture images.
If, instead, you use the Browse button in the field Texture, the Windows Open dialog will appear. In the Open dialog, you go to the folder where the textures are stored and choose the texture you want. The assumption is that you know what the textures look like and what they are called, as the images are not displayed. Using Browse saves a lot of time, as the textures are not displayed on the screen.