
The Auto 3D tab contains settings for the two automatic cameras on the toolbar. Accordingly, what you pre-set here will only affect images that are generated automatically in the program, using the two buttons Auto 3D (Fast) and Auto 3D (Detailed).
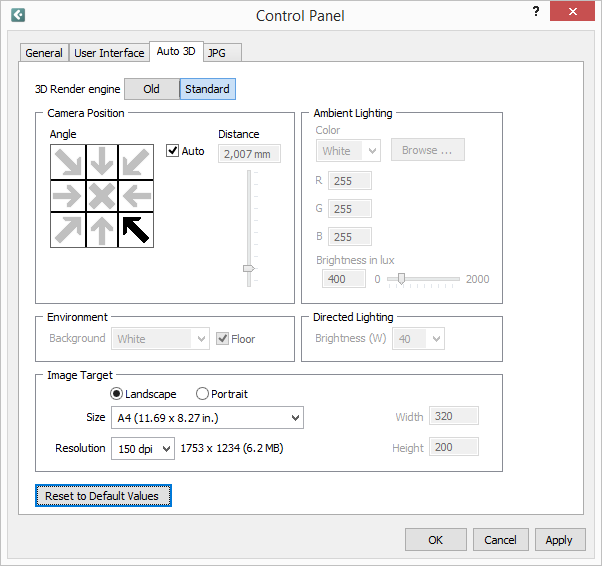
Figure 1: The Control
Panel's Auto 3D tab.
The first setting is for the 3D render engine where the options are Old and Standard. This controls which method the two Auto 3D buttons in the toolbar are using for rendering. Old means that the simple graphics engine will render the images, which will lock the program; while Standard means that a the advanced graphics engine will render the images via a separate render server, which will not lock the program but let you continue to work.
Note:
|
Further down, the Auto 3D tab in the Control Panel contains four main fields: Camera Position, Ambient Lighting, Environment, Directed Lighting and Image Target.
In the Camera Position field you use the arrows to select the angle from which you want the automatic photographs to be taken. If, for example, you want to take a picture from the top right corner of the drawing area, choose the arrow in the top right corner. To take a picture from above, choose the cross in the center.
The Auto box is checked by default. This means that the camera-distance calculations are automated. Unchecking the box will allow you to set the camera distance for all angles manually. The text field and the slider bar are then activated. Under the Distance heading, choose the desired distance between the camera and the object you are about to take a picture of, by dragging the slider bar or typing the distance in the text field.
In the drop-down list under the Color heading you can choose your preferred color for the ambient lighting. There is a choice of white, red, green, blue or yellow light. You can also define your own RGB Color by choosing Custom in the list. The Browse button opens the Select and Edit RGB Color dialog. Here you can easily mix your own RGB colors and create a database containing them.
To, for example, use yellow ambient lighting instead of the default white one, follow these steps:
Under the heading Color, click the arrow to expand the drop-down list.
Choose Yellow.
Click on OK or Apply.
Click on one of the Auto 3D options on the toolbar, in order to see the result.
Using the Brightness in lux slider bar, you can set the brightness the surrounding light that Configura automatically adds when developing a 3D picture.
Note:
|
In the Environment field, you can select the background of the pictures taken by the automatic cameras. This is done in the drop-down list next to Background.
You can also choose whether the developed picture should have a floor or not by ticking the Floor checkbox.
In pictures developed using one of the two automatic cameras, besides the ambient lighting, a spotlight is also automatically inserted in the background. The spotlight is directed towards the object. In the Directed Lighting field, in the drop-down list next to Brightness (W), you can select how strong you want the light from the spotlight to be in watt).
In the Image Target field you can make different settings for the image that are about to be rendered. You have three different options:
Orientation: Choose the orientation of the image that are about to be rendered; landscape or portrait.
Size: Specify the size of the image by selecting one of the options in the Size drop-down menu, or enter the exact size (in pixels) in the input fields to the right.
Resolution: You also have the possibility to change the resolution of the image by selecting one of the options in the Resolution drop-down menu. The resolution concerns the quality of the image; the higher resolution, the better quality of the rendered image.
At the bottom of the dialog is a Reset to Default Values button where at any stage, you can reset the settings on the tab to the default values.
Note:
|