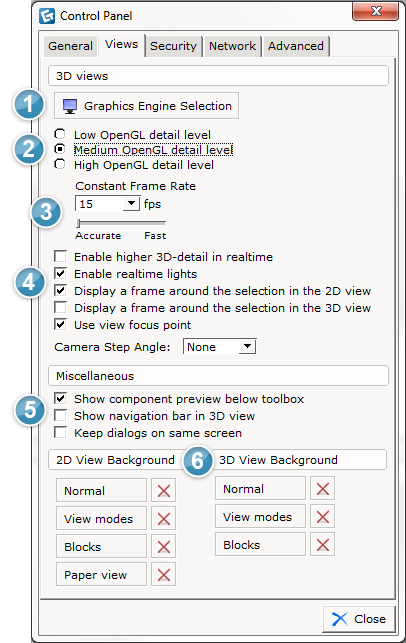

On the Views tab you can make the following settings:
Graphics Engine Selection: There are two graphics engines available in CET Designer. One of the graphics engines requires more memory and capacity of your computer, but have several advantages. By clicking the Graphics Engine Selection button, you can check if your computer has enough capacity to utilize the advanced engine. Read more >>
Select detail level displayed in the animated 3D view. Note that these options are only available when the simple graphics engine is in use. Read more >>
Choose how much of the 3D view that should be displayed in realtime when moving the camera. This is a way of guaranteeing smooth movement when navigating in the program.
Select
or deselect the following checkboxes:
- Enable higher 3D-detail in realtime:
increases the level of detail for objects that are close to
the camera in the 3D view. Note that this option is only available
when the advanced graphics engine is in use.
Read more >>
- Enable realtime lights: enables
constant updating of light across your visible 3D scene. Note that
this operation is demanding on system resources. This checkbox is
selected by default.
- Display a frame around the selection
in the 2D view: A purple frame will be displayed around selected
components in the 2D view. This checkbox is selected by default.
- Display a frame around the selection
in the 3D view: A purple frame will be displayed around selected
components in the 3D view. This checkbox is deselected by default.
- Use view focus point: by
deselecting this option CET Designer switches to pointer-based navigation.
This means that any zooming in or out is centered on the position
of the mouse pointer on your screen. The same goes for rotating your
view. CET Designer will rotate the view around the object currently
located underneath the pointer. This checkbox is deselected by default.
- Camera step angle: when rotating
the camera around the 3D view, CET Designer snaps to different angle
steps. Note that rotating the camera quickly will stop CET Designer
from snapping the 3D view into position.
Select
or deselect the following checkboxes:
- Show component preview below toolbox:
previews a selected component below the toolbox. This checkbox is
selected by default. Read
more >>
- Show navigation bar in 3D view:
shows or hides the 3D view navigation bar. This checkbox is selected
by default.
- Keep dialogs on the same screen:
Opens all new dialogs on the same screen.
Select background color for your views. Click the button for the view you wish to change and select background color. Clicking the red X resets the background color to default (=white).
Note
|

Figure 1: The Views tab in the CET Designer control panel.