
On the Environment tab (see figure 1) you can change the environment in which the components are located. For example, you can add background effects and remove or add a floor or a ceiling.
At the top of the Environment tab, you can check the boxes Ceiling and Floor if you want to have a ceiling or a floor in your 3D image, (you will see the changes reflected in the Camera View and on the developed 3D image). Check both options, if you want both a ceiling and a floor.
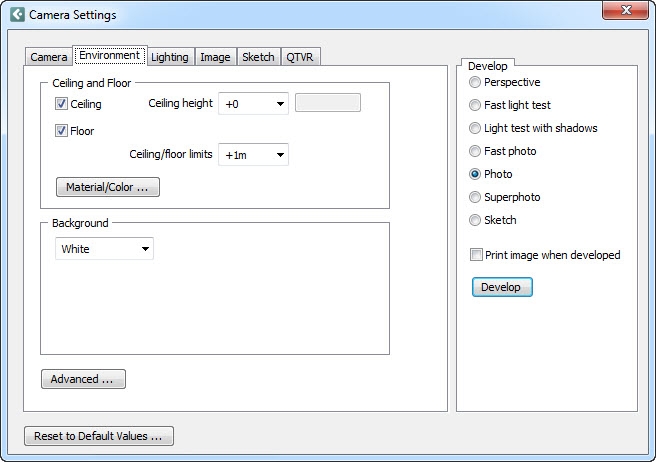
Figure 1 - the Environment tab
|
Note: If you do not check either the Ceiling or Floor boxes, the following items will be deactivated: the Material/Color button and the drop-down lists Ceiling Height and Ceiling/floor limits. If only the Floor box is checked, the following list box is deactivated: Ceiling Height. |
Using the Material/Color button, you can open the dialog Material/Color Change. In this dialog, you can change the material and color of the floor and ceiling that you will use.
In the Ceiling height drop-down list, you can choose a ceiling height or Input. Using Input you can enter the exact ceiling height yourself. If you choose Input the height, for example 2,750 mm, is measured from the floor. The dimensions you choose in the list box, however, are measured from the top part of the highest component which you have positioned in the drawing area. If you choose 100 mm, the ceiling will be 100 mm above the highest component you have placed on the drawing area. The ceiling is only visible in 3D.
In the Ceiling/floor limits drop-down list, you can choose the size of the area covered by the floor and ceiling. The floor and the ceiling cover the same area but at different heights. If you check the Floor box, a floor will always be displayed. The smallest option (+0) covers only the area on which the component(s) are standing. If you choose +3m the floor will cover an area of three meters round the component, or where there is more than one component, the component which is furthest out. The same applies to the ceiling, if the Ceiling box is checked.
In the Background drop-down list there are a number of different backgrounds which you can use when you develop 3D images. The backgrounds are White, Light Gray, Clear Sky, Clouds, Graduated sky, Black, Custom and Image. Using Custom, you can create your own RGB colors by entering values for red (R), green (G) and blue (B). If you choose Custom, you can also use the button Browse.
Image allows you to use a photograph or another type of image as a background (the image file must be on your PC).
Follow these instructions to use an image as a background:
Choose the Image option from the drop-down list Background.
Choose one of the options Tile (lots of small images next to one another) or Full (one large image).
Click on the Browse button to select the desired image (this assumes that you know what the images look like, as they are not displayed). The Open dialog is displayed.
Choose an image and click on Open.
Choose the Photo developing option and click on Develop in the Camera dialog to see the result.
If you do not know what the image looks like, you can choose the Preview option.
To do this, follow the instructions below:
Click on the button Preview. The Textures dialog is displayed.
Click on the Folder button in the top left-hand corner of the dialog. Another dialog is displayed, which allows you to go to the folder where your images are.
Choose the folder which contains the image you want and click on OK in the dialog box. The images in the folder are displayed in the dialog Textures.
Choose an image by clicking on it. The image is surrounded by a pink frame.
Click on OK or Apply.
The path for the texture you have chosen is displayed in the bottom left-hand part of the dialog Camera.
Click on Develop in the Camera Settings dialog.
Using the Advanced button, you can open the dialog Advanced Environment Settings. In this dialog you can create light effects and other special effects, such as ground fog, snow and fog. You choose these effects from the drop-down list under the heading Special Effects. You can then enter settings for the special effect in the field which appears under the drop-down list Special Effects. Finish by clicking on OK or Apply.