
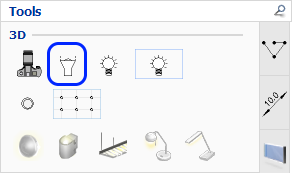
The Spotlight in the Tools tab can be used as a general or a directional light source.
The easiest way to place it is to position the spotlight, point it, and set the distance at the same time, although it can also be adjusted and moved after placement.
Just be careful with the height when placing spotlights, as they will not cast any light if placed above the ceiling.
To place a spotlight in your drawing, follow these steps:
On the Tools tab, click to select the spotlight and move it to the drawing area.
Click and hold the left mouse button to place the spotlight in the drawing.
Continue to hold down the left mouse button and start to move the mouse cursor away from the spotlight component. The mouse cursor now controls the Target, i.e. where you want the light to fall.
Keep moving the mouse to find the desired direction and angle, and place the target on the component that you want to light up.
Release the mouse button. The spotlight and target are now in place and a new spotlight component is available on the mouse cursor.
Keep clicking if you want to add more spotlights to your drawing.
When you are finished, press the Esc key or move the cursor outside the drawing area to release the component.
You can increase or reduce the width of the beam of light by clicking on one of the wide angle's snap points (see Figure 1) and dragging it inwards or outwards.
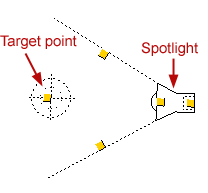
Figure 1
You can move the spotlight and its target without the relationship between them changing.
Follow the instructions below:
Click anywhere on the spotlight, except on the snap points, and hold the mouse button down.
Drag the spotlight to the position on the drawing area where you want it. The target will follow.
Release the mouse button.
You can move the target without moving the spotlight. This means that you can move the light from one component to another.
Follow the instructions below:
Make the spotlight activated by clicking on it, if it is not activated already.
Place the mouse pointer over one of the yellow snap points on the target, and click and hold the mouse button.
Drag the target to where you want it to be. You can rotate the target through 360 degrees or move it nearer to or further away from the spotlight.
Release the mouse button.
You can move the spotlight without moving the target. This means that you can make the light shine from a different direction, and that you can move the light source nearer to the component which it is lighting.
Follow the instructions below:
Make the spotlight activated by clicking on it, if it is not activated already.
Click on one of the spotlight's snap points (see Figure 1), and click and hold the mouse button.
Drag the spotlight to the position where you want it. You can rotate the spotlight through 360 degrees or move it nearer to or further away from the target.
Release the mouse button.
Double-clicking a spotlight brings up the Light Settings dialog where you adjust the spotlight.
Note:
|