
Having selected the desired product series, you need to do your Design Specifications.
Clicking on the Design Specifications button below, will open a dialog called Design Specifications Shelving.
The dialog contains three tabs:
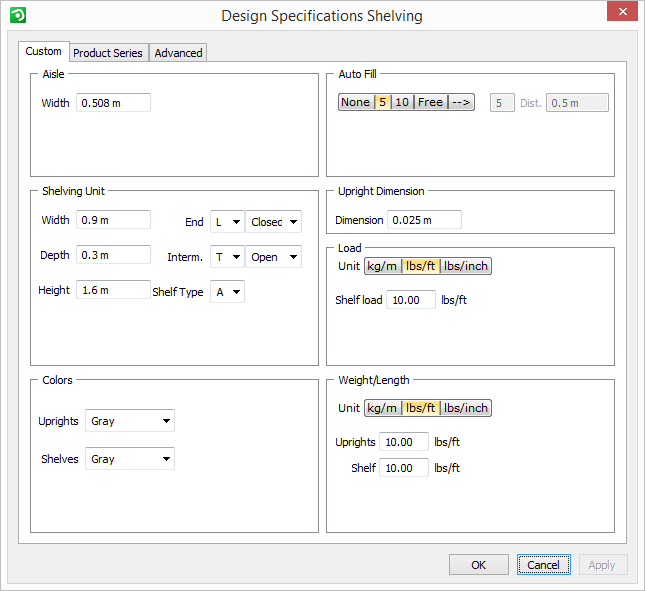
Custom - this tab is only activated when the Customized option has been selected. The changes you make are saved with the drawing.
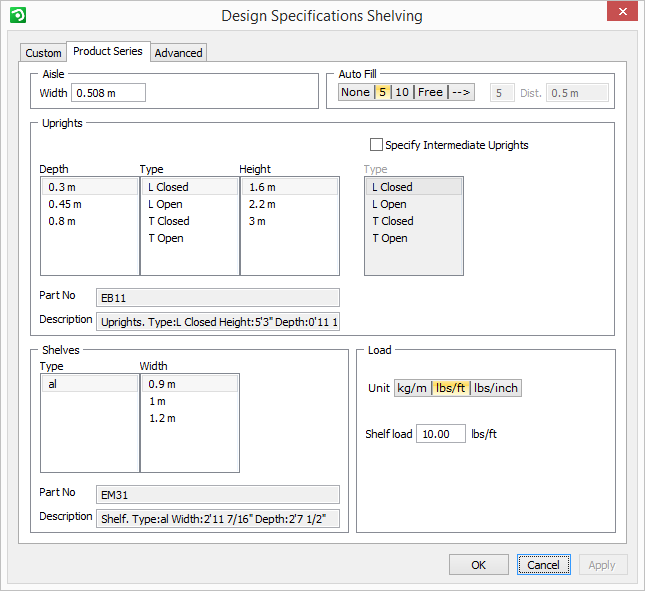
Product Series - this tab is only available when you have selected a product series that you have imported or created yourself in the Administrative Tool.
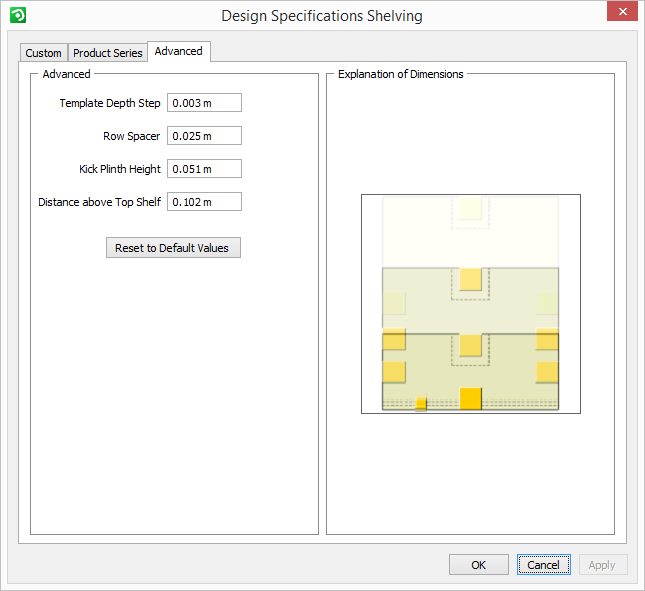
Advanced - this tab contains options that apply both to customized systems and product series.
|
Note:
|
The Custom tab contains seven main fields (Aisle, Shelving Unit, Colors, Auto Fill, Upright Dimension, Load and Weight/Length), in which different settings can be applied.

In the Aisle field, enter the desired default Width of the aisle.
In the Shelving Unit field, enter the Width, Depth and Height of the shelving unit. In the drop-down lists to the right, you can select between an L pole (a pole that has the shape of an 'L' if you make a cross-section) or a T pole (a pole that has the shape of a 'T' if you make a cross-section) for the End and the Intermediate uprights. It is also possible to choose between open or closed sides.
In the Colors field, select the desired colors for shelves and uprights in the two drop-down lists.
In the Auto Fill field, select the desired number of shelves per upright (None, 5 or 10). Selecting the Free option will activate the field to the right where you can enter the exact distance between the shelves. Clicking on the fourth button with the arrow will allow you to enter any number of shelves.
In the Upright Dimension field, specify the thickness of the posts.
The Load field allows you to select the desired weight and length units for the load, as well as to enter the exact Shelf load weight per length.
The Weight/Length field allows you to select the desired weight and length units, as well as enter the exact Uprights and Shelf weight per length.
When you have finished with your selections, click on OK or Apply.
The Product Series tab contains five main fields (Aisle, Uprights, Shelves, Auto Fill and Load), in which different product series settings can be applied.

In the Aisle field, enter the desired default Width of the aisle.
In the Uprights field, select Depth, Type and Height by clicking and selecting the desired values in the three columns. It is also possible to apply settings for the intermediate uprights. To do this, check the box Specify Intermediate Uprights. This will activate the columns below in which you can select Type and Height by clicking and selecting the desired values in the two columns.
In the Shelves field, select Type and Width by clicking and selecting the desired values in the two columns.
In the Auto Fill field, select the desired number of shelves per upright (None, 5 or 10). Selecting the Free option will activate the field to the right where you can enter the exact distance between the shelves. Clicking on the fourth button with the arrow will allow you to enter any number of shelves.
The Load field allows you to select the desired weight and length units for the load, as well as to enter the exact Shelf load weight per length.
When you have finished with your selections, click on OK or Apply.
The Advanced tab contains one field, in which different advanced settings can be selected.

The advanced options that can be pre-set are the following:
Template Depth Step - sets the increment used when stretching a template.
Row Spacer - sets the distance between the two rows in a double template, or the distance between two single templates that are snapped together.
Kick Plinth Height - the distance between the floor and the lower edge of the first shelf.
Distance above Top Shelf - the distance between the topmost shelf and the upper edge of the upright.
The button Reset to Default Vales allows you to return to the pre-set default values.
When you have finished with your selections, click on OK or Apply.
|
Note:
|
To read more about the Shelving Storage tab, click here.