
Having selected whether to work with Product Series or Customized products, you need to do your Design Specifications.
Clicking on the Design Specifications button below, will open a dialog called Design Specifications Drive-In/Push-Back.
The dialog contains three tabs:
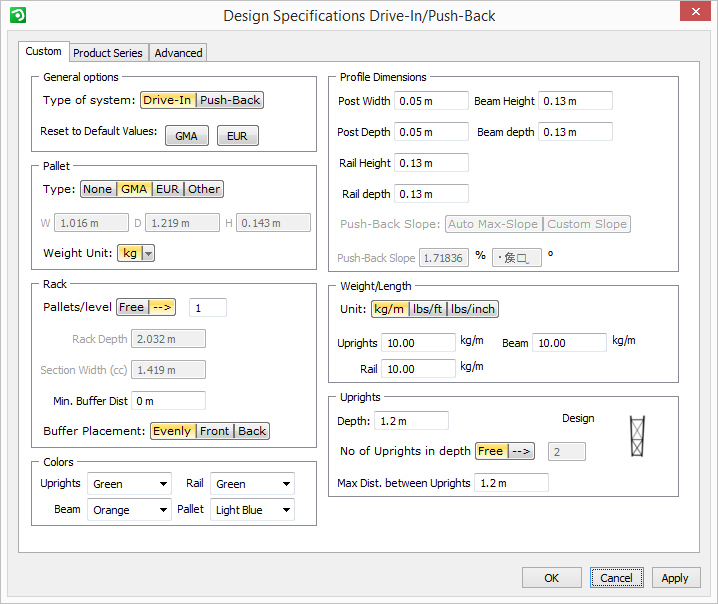
Custom - this tab is only available when you have selected the Customized option at the top of the Drive-In/Push-Back component tab. Here you customize a drive-in or a push-back system from the start.
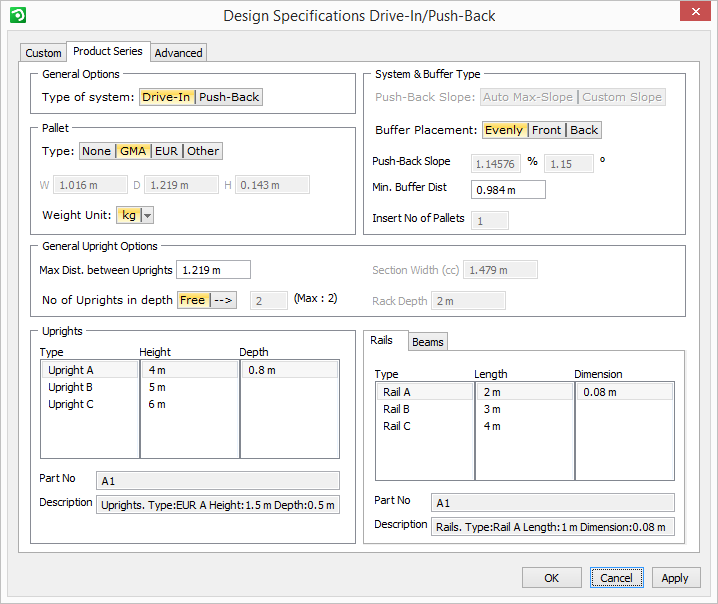
Product Series - this tab is only available when you have selected a product series that you have imported or created yourself in the Administrative Tool.
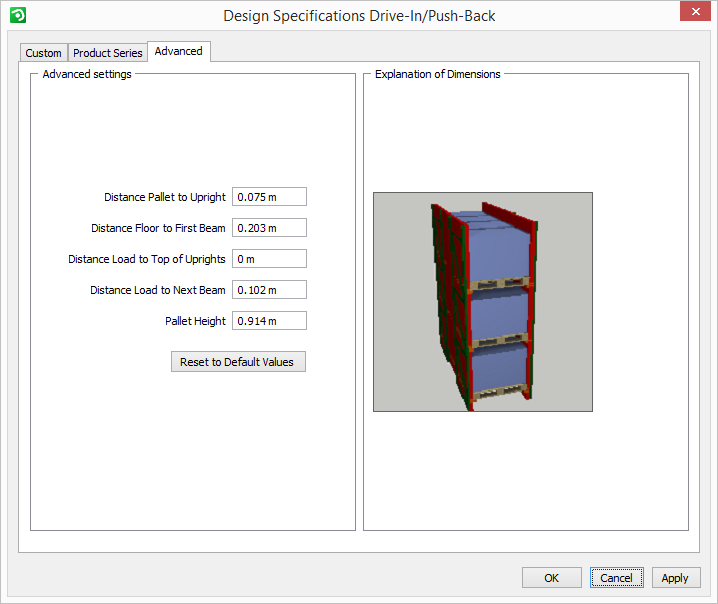
Advanced - contains more advanced settings.
|
Note:
|
The Custom tab contains seven main fields (General Options, Pallet, Rack, Colors, Profile Dimensions, Weight/Length and Uprights), in which different settings can be applied.

In the General Options field, select type of system, drive-in or push-back. If you want to reset the values in the Design Specifications dialog, click GMA or EUR and default values will apply.
In the Pallet field, select the desired Type of pallet and the Weight Unit that you would like to work with. If you prefer not to have a pallet showing graphically in the drawing area, select None. To be able to type in the exact pallet dimensions, select Other and enter the width (W), depth (D) and height (H) of the pallet.
|
Note:
|
In the Rack field, enter the desired number of pallets per beam level (Pallets/level). Selecting the Free option will activate the field below where you can enter the exact Rack Depth. If you have chosen not to have a pallet visualized in the Pallet field, you specify the desired width of a section in the Section Width field below. The setting Min. Buffer Dist. allows you to enter the minimum buffer distance between the pallet rows. Finally, the Buffer Placement can be determined. Choose between the three options Evenly, Front and Back.
In the Colors field, select the desired colors for uprights, beams, rails and pallets in the two drop-down lists.
In the Profile Dimensions field, specify the Post Width and the Post Depth as well as the Beam Height and the Beam Depth. If you have selected the Push-back type in the General Options field, this is where you set the slope of the beam. Two options are available: Auto Max-Slope (takes the weight per pallet into account and automatically calculates the recommended beam slope) and Custom Slope (allows you to specify a value). Clicking on the Custom Slope button will activate the option below, Push-Back Beam Slope. Enter the desired value as a percentage or the desired angle.
The Weight/Length field allows you to select the desired weight and length units, as well as enter the exact upright and beam weight per length.
In the final Uprights field, enter the Depth of the upright. You can also specify the desired number of uprights that you want in depth or, if selecting the Free option, type in the desired distance between the uprights. Furthermore, the maximum distance between uprights is also specified here.
When you have finished with your selections, click on OK or Apply.
|
Note:
|
The Product Series tab contains six main fields (General Options, Pallet, System & Buffer Type, General Upright Options, Uprights and Rails/Beams), in which different settings can be applied.

In the General Options field, select system type, drive-in or push-back.
In the Pallet field, select the desired Type of pallet that you would like to work with. If you prefer not to have a pallet showing graphically in the drawing area, select None. To be able to type in the exact pallet dimensions, select Other and enter the width (W), depth (D) and height (H) of the pallet. You can also select the desired Weight Unit.
|
Note:
|
In the System & Buffer Type field to the right, you can set the slope of the beam (provided that you have selected the Push-back type). Two options are available: Auto Max-Slope (takes the weight per pallet into account and automatically calculates the recommended beam slope) and Custom Slope (allows you to specify a value). Clicking on the Custom Slope button will activate an option below, Push-Back Rail Slope. Here you enter the desired value as a percentage or the desired angle. For drive-in systems, the Buffer Placement can be determined. Choose between the three options Evenly, Front and Back. The setting Min. Buffer Dist. allows you to enter the minimum buffer distance between the pallet rows. Finally, enter the desired number of pallets that should be inserted
In the General Upright Options field, you can enter the desired maximum distance between the uprights. It is also possible to specify the desired number of uprights that you want in depth or, if selecting the Free option, to type in the desired distance between the uprights. If you have chosen to work with drive-in systems but not using pallets, the Section Width option is available. If you have chosen to work with push-back systems, the Rack Depth option is available.
In the Uprights field, select the Type, Height and Depth by clicking and selecting the desired values in the three columns.
In the Rails/Beams field, select Type, Length and Dimension for either Rails or Beams (depending on the system type you have selected) by clicking and selecting the desired values in the three columns.
When you have finished with your selections, click on OK or Apply.
|
Note:
|
The Advanced tab contains one field, in which different advanced pre-sets can be done. When entering a value, the picture to the right will depict the selected distances.

The advanced options that can be pre-set are the following:
Distance Pallet to Upright - sets the distance between the pallet and the upright (only available for the drive-in system).
Distance Floor to First Beam - sets the distance between the floor and the first beam.
Distance Load to Top of Uprights - sets the distance between the load on the pallets on the highest beams and the top of the uprights.
Distance Load to Next Beam - sets the distance between the top of the load to the next beam.
Pallet Height - here you enter the height of the load, which includes the height of the pallet.
The button Reset to Default Vales allows you to return to the pre-set default values.
When you have finished with your selections, click on OK or Apply.