
Having selected the desired product series, you need to do your Design Specifications.
Clicking on the Design Specifications button, will open a dialog called Design Specifications Selective Pallet Racks.
The dialog contains three tabs:
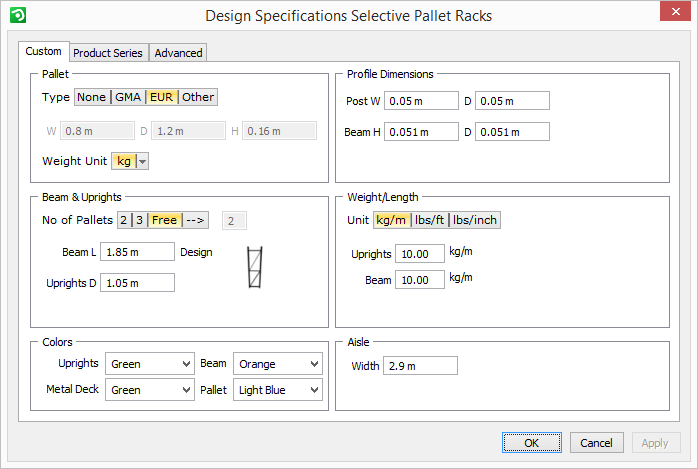
Custom - this tab is only activated when either the US Std DB or the Europe Std DB series have been selected. These two databases are included by default as a part of the program. Once you change a setting within the standard databases, you begin customizing it instead of using the pre-sets. The changes you make are saved with the drawing.
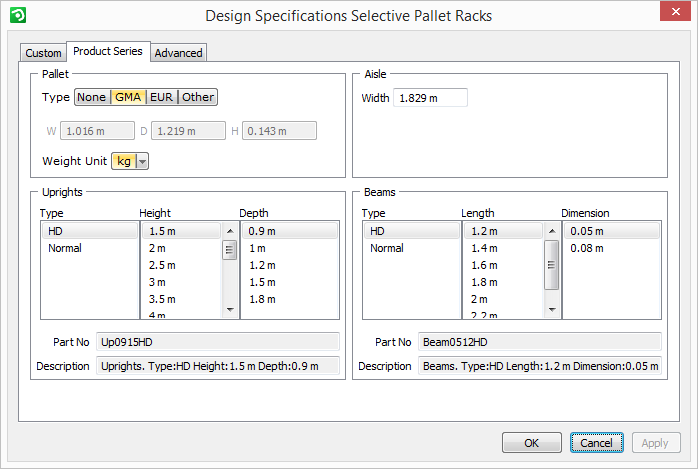
Product Series - this tab is only available when you have selected a product series that you have imported or created yourself in the Administrative Tool.
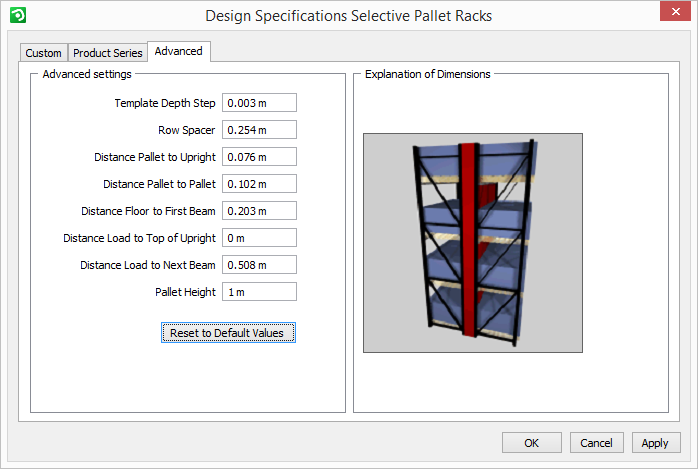
Advanced - this tab contains options that apply to both the standard databases included in the program and product series.
|
Note:
|
The Custom tab contains six main fields (Pallet, Beam & Uprights, Colors, Profile Dimensions, Weight/Length and Aisle), in which different settings can be applied.

In the Pallet field, select the desired Type and the Weight Unit that you would like to work with. If you prefer not to have a pallet showing graphically in the drawing area, select None. To be able to type in the exact pallet dimensions, select Other and enter the width (W), depth (D) and height (H) of the pallet.
In the Beam & Uprights field, select the desired number of pallets (No of Pallets) per beam. Selecting the Free option will activate two fields below where you can enter the exact length of the beam (Beam L) as well as the exact depth of the uprights (Uprights D). Clicking on the fourth button with the arrow will allow you to enter any number of pallets. In the Design choice, you can choose between different upright models. Click on the image to the right and select the desired model in the drop-down list that appears.
In the Colors field, select the desired colors for uprights, beams, metal decks and pallets in the two drop-down lists.
In the Profile Dimensions field, specify the width (Pole W) and the depth (Pole D) for the posts as well as the height (Beam H) and the depth (Beam D) for the beams.
The Weight/Length field allows you to select the desired weight and length units, as well as enter the exact Upright and Beam weight per length.
In the Aisle field, enter the desired default Width of the aisle.
When you have finished with your selections, click on OK or Apply.
The Product Series tab contains four main fields (Pallet, Uprights, Aisle and Beams), in which different product series settings can be applied.

In the Pallet field, select the desired Type that you would like to work with. If you prefer not to have a pallet showing graphically in the drawing area, select None. To be able to type in the exact pallet dimensions, select Other and enter the width (W), depth (D) and height (H) of the pallet. You can also select the desired Weight Unit.
In the Uprights field, select the Type, Height and Depth by clicking and selecting the desired values in the three columns.
In the Aisle field, enter the desired default Width of the aisle.
In the Beams field, select Type, Length and Dimension by clicking and selecting the desired values in the three columns.
When you have finished with your selections, click on OK or Apply.
|
Note:
|
The Advanced tab contains one field, in which different advanced settings can be selected.

The advanced options that can be pre-set are the following:
Template Depth Step - sets the increment used when stretching a template.
Row Spacer - sets the distance between the two rows in a double template, or the distance between two single templates that are snapped together.
Distance Pallet to Upright - sets the distance between the pallet and the upright.
Distance Pallet to Pallet - sets the distance between pallets.
Distance Floor to First Beam - sets the distance between the floor and the first beam.
Distance Load to Top of Upright - sets the distance between the load on the pallets on the highest beams and the top of the uprights.
Distance Load to Next Beam - sets the distance between the top of the load to the next beam.
Pallet Height - here you enter the height of the load, which includes the height of the pallet.
The button Reset to Default Vales allows you to return to the pre-set default values.
When you have finished with your selections, click on OK or Apply.
|
Note:
|
To read more about the Selective Pallet Racks tab, click here.