
The rendering options you choose influence the results of the image generated when you click Render in the program. To choose rendering options, click the Rendering options button on the toolbar between the 2D and 3D views (see Figure 1). The Rendering dialog box opens.

Figure 1
Click here to view the Rendering dialog box.
In the Rendering dialog box make settings for:
Also, read about settings located under the tab Fullscreen, settings for Lighting and Brightness/Contrast.
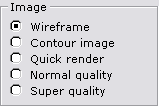
The following options are available:
- Wireframe: Black and white cross-section.
- Contour image: Black and white contour image.
- Quick render: gives you a quick preview of what the image will look like when rendered.
- Normal quality: gives you a rendered image with good quality.
- Super quality: gives you a high-quality image.

Figure 2
|
Note:
|
The following options are available:
- Enable realtime lights: This means that lights and shadows update themselves instantly as you work and move objects on the drawing area. Note, this is a very recourse intensive operation.
- Predefined light settings: Choose predefined light settings in the drop down menu. The different options in the menu are suitable for different types of drawings.
- Settings: Click the Settings button to make detailed settings for the option you have chosen in the drop down menu above.

Figure 3
|
Note:
|
In the field for Renderings limits (see figure 4) it's possible to set how many components and lights you wish to render. Choosing not to render the complete drawing reduces the rendering time significantly. When you choose to render a specific number of components, it's the ones closest to the camera that will be rendered.

Figure 4