The Shelving Unit field contains the key components for setting up shelving systems (see Figure 1).
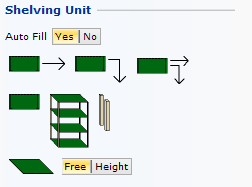
Figure 1: Shelving unit.
Under the heading, on the top row, you will find a the Auto Fill choice which, if activated, fills the shelving unit with shelves automatically. If you do not want shelves added automatically, select No.
On the second row you will find three different automatic functions that enable you to easily fill a template layout with shelving units: Auto, Copy and Auto/Copy.
The following items are:
The single Shelving Unit component that either can be placed manually inside a template or directly on the drawing area
An Elevation view.
The Additional Height tool that enables you to change the height of the uprights.
The Shelf component.
When you draw larger systems with identical shelving units and work with templates, you select one of the three components Auto, Copy or Auto/Copy from the first row under the Shelving Units heading:
The Auto component fills one template at a time with shelving units (e.g. a single template).
The Copy component copies the shelving units of one template to all other empty templates in the group.
The Auto/Copy component fills one template with shelving units and then automatically, in one step, copies them to all other empty templates in the same group.
To learn more about this, click on this example.
When you start a drawing with the shelving units immediately (without using the templates), you then select the regular Shelving Unit component and an Elevation from the second row under the Shelving Unit heading.
To learn more about this, click on this example.
The Elevation view is a references to the two-dimensional (plan view) Shelving Unit component. It enables you to view and modify the component from the side. Read more about elevations.
The Additional Height component snaps to an elevation and is mainly to be used for changing the height on only one side of the upright.
Proceed as follows:
On the elevation, snap the Add Height component to the desired side of the upright.
Now it is possible to stretch that one side of the elevation.
The Shelf component snaps to an elevation and allows you to add shelves to it.
You have two options:
Free: By selecting this option you decide the shelf's height above the floor by moving the shelf up and down the elevation.
Height: By selecting this option you can specify how high above the floor the shelf should be positioned.
To read more about the Shelving Storage tab, click here.