
When positioning a line drawing component in the drawing area, different dimensions must be determined. The positioning is therefore done in several steps, each of which is needed to be confirmed unlike most components in the program where only one mouse click is required.
After you have selected the desired component, brought it onto the drawing area and clicked once, an input display always appears. Here you can pre-define properties and dimensions of the component, before it is placed in the drawing area.
There are three different methods to place a line-drawing component:
If you know the exact dimensions of the components that are to be placed in the drawing, the easiest way is to type in the desired values in the input display that appears automatically as soon as you click once in the drawing area. Step by step, the input display continues to appear until all the required values for the component have been specified. Confirm each input by pressing the Tab key and confirm all values by pressing Enter or use one of the arrow keys.
|
Note:
|
It is not required that you type in exact values for each component. Having fetched the component and clicked once in the drawing area, you can also simply drag the mouse pointer in different directions in order to give the component approximate dimensions. Confirm each step by clicking.
Select your component and click once in the drawing area. Then move the mouse pointer outside the drawing area. Although the component has not yet been defined, it has now been clicked in position on the drawing area. It has adjusted to its standard size and appearance according to the grey Line Drawing tabs. Now you can change the component afterwards by stretching and shrinking or by right-clicking on it and selecting Settings.
|
Note:
|
When you move a line drawing component close to an existing object in the drawing area, an input display with different options is always shown where you enter different values. The first option - Snap to - allows you to determine which points the line drawing component should find and snap to on the existing object.
Three options five available - All, Middle, End, Center and Intersection (see Figure 1 below). You move between the different options by pressing one of the arrow keys on the keyboard. Click when you have finished. After deciding where to snap, click to position in the usual manner.
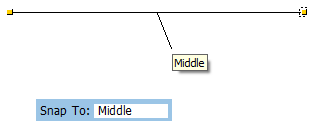
Figure 1
A new input display is shown, giving you new options (see Figure 2).

Figure 2
This is how input displays work:
You enter the values you want by using the keyboard. When you enter a value, it is highlighted in bold and the component is "locked" on the basis of the specified settings.
You open a locked value using the space bar.
You lock a value using the space bar.
You can delete a locked value by using the backspace key.
You move between the text fields using the Tab key.
When a question is asked in an input display, you only need to enter the first letter of the answer: Y for yes, N for no, L for left and R for right.
You confirm dimensions and choices you have entered in input displays by:
Clicking with the mouse button.
Pressing Enter.
When you use double lines, double arcs, double circles and double rectangles, you must always choose Side or Inner side for the double line (Figure 3). The dashed line which appears shows where it is possible to position the double line. The two solid lines show where the double line would be positioned if you clicked just at that moment.
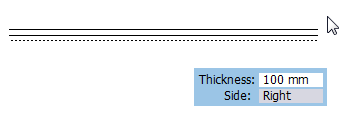
Figure 3
There are two ways of choosing Side/Inner side:
Using the mouse: Move the mouse pointer over the double line, arc or circle and choose the side by clicking.
Using the input display: Enter R for right or L for left in the Side field (double line), or Y for yes or N for no in the Inner side field (double arcs and double circles).
In all these cases (double lines, arcs and circles), the choice of the double line is the last choice you make before you click the component in position in the drawing area.
There is a difference between the inner and outer dimension. When you are working with double lines and with the line tool Double line, make sure that your inner dimension does not become an outer dimension. The most frequent dimension you take is the inner dimension - you measure the inside of a room, not the outside.
Line drawing components snap to one another. When you move a new line drawing component towards another which is already positioned on the drawing area, the new component automatically finds specific points on the positioned component. To determine which points the component should snap to, move between the different options in the Snap to field by pressing one of the arrow keys on the keyboard. Three options are available - All, Middle and End.
Guidelines:
InstantPlanner automatically finds the ends and the middle of straight lines, the ends of arcs and the center of arcs and angles. Help text is displayed at these points.
When you stretch a line, InstantPlanner finds the perpendicular connection to both lines and arcs.
On arcs, InstantPlanner also finds the point where a line touches the arc.
You can change line drawing components after you have positioned them in the drawing area. You do this in the dialog Settings. You open the Settings dialog by right-clicking on the component and choosing Settings from the pop-up menu which appears.
You can stretch and shrink line drawing components after you have positioned them, just as you can with most other components in the program. In this case, however, you cannot enter an exact value.
To stretch a line and enter an exact length for the line, follow these instructions:
Double-click on one of the line's snap points and move the mouse pointer slightly.
Enter a new value in the input display that appears automatically.
Confirm the length by clicking.