
Under the heading Lines, there are four different components: Line, Multiple lines, Double line and Multiple double lines.

Provided that you have pre-set a height for the lines in the Defaults dialog, they will appear in 3D.
You place lines in the same way as other line drawing components. You can also stretch and rotate lines, and change their color in the plan view as well as in 3D.
If you want to position a line and give it an exact dimension, the easiest method is to enter the dimension in the input display which is shown after you have selected the component and clicked once in the drawing area.
To do this, follow the instructions below:
Select the Line component and click it in position in the drawing area.
In the input display, enter the desired length in the field Length.
Move the mouse pointer in the direction you want to get the correct angle and click with the mouse button.
You can also position the Line component without using the input display.
Follow the instructions below:
Select the component and click it in position in the drawing area.
Drag out the line in the direction you want, until it is the length you want.
Click with the mouse.
The Multiple lines component functions in the same way as the Line component, but you can draw as many lines as you want one after the other using the arrow keys.
Follow the instructions below:
Select the component and click it in position in the drawing area. From this point on, the easiest way to continue is to use the keyboard.
In the input display, enter the length you want in the field Length.
Choose the direction and angle of the line using one of the arrow keys.
The input display is still displayed. Enter the next dimension.
Choose the direction using one of the arrow keys.
Repeat these steps until you have all the lines you want.
You can also position the Multiple lines component without using the input display.
Follow the instructions below:
Select the component and click it in position in the drawing area.
Drag out the line in the desired direction, until it is the length you want.
Click again. A new line appears next to the mouse pointer. The new line is connected to the previous line.
Drag out the new line in the direction you want until it is the length you want.
Click the line in position. A new line appears next to the mouse pointer.
Repeat these steps until you have all the lines you want.
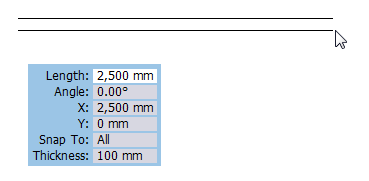
The Double line component functions in the same way as the Line component, but you create two parallel lines. Remember the inner and outer dimensions when you are working with the Double line. In the input display for the double line is a field in which you can enter the distance between the two lines (Figure 1). In the Defaults dialog, this distance is referred to as the double line's Thickness.
Follow the instructions below, to use the Double line:
Select the component and click it in position in the drawing area. From this point on, it is simplest to use the keyboard.
In the input display, enter the length you want in the field Length.
Choose the direction of the line using one of the arrow keys.
The input display is still displayed. Once again, use the arrow keys to select side for the second, double line (Left, Center or Right).
Confirm your selections by pressing Enter.

Figure 1
You can also position the Double line component without using the input display.
Follow the instructions below:
Select component and click it in position on the drawing area.
Drag out the line in the direction you want, until it is the length you want. Confirm by clicking.
Choose the side for the second line by moving the mouse pointer over the line and clicking on the side where you want the double line to appear.
Confirm your selections by clicking.
With the Multiple double lines component you can draw as many double lines as you want one after the other using the arrow keys.
Follow the instructions below:
Select the component and click it in position in the drawing area. From this point on, it is simplest to use the keyboard.
In the input display, enter the length you want in the field Length.
Choose the direction of the line using one of the arrow keys.
The input display is still displayed. Once again, use the arrow keys to select side for the second, double line (Left, Center or Right).
Confirm your choice with Enter.
The input display is still displayed. Enter the Length for the next line.
Choose its direction using one of the arrow keys.
Repeat these steps until you have all the lines you want.
You can also position the Multiple double lines component without using the input display.
Follow the instructions below:
Select the component and click it in position in the drawing area.
Drag out the line in the desired direction, until it is the length you want.
Confirm by clicking.
Choose the side for the second line by moving the mouse pointer over the line and clicking on the side where you want the double line to appear.
Click again. A new line appears next to the mouse pointer. The new line is connected to the previous line.
Drag out the new line in the direction you want until it is the length you want.
Click the line in position. A new line appears next to the mouse pointer.
Repeat these steps until you have all the lines you want.
|
Note: You only need to select the side on which to put the double line once. |