
The program's work area has a clear and simple design. Starting at the top and working your way down, the user interface contains the following areas:
Title bar
Menu bar
Toolbar
Component tabs
Status bar
Drawing area
You find a more detailed description of the different parts of the user interface below the picture.
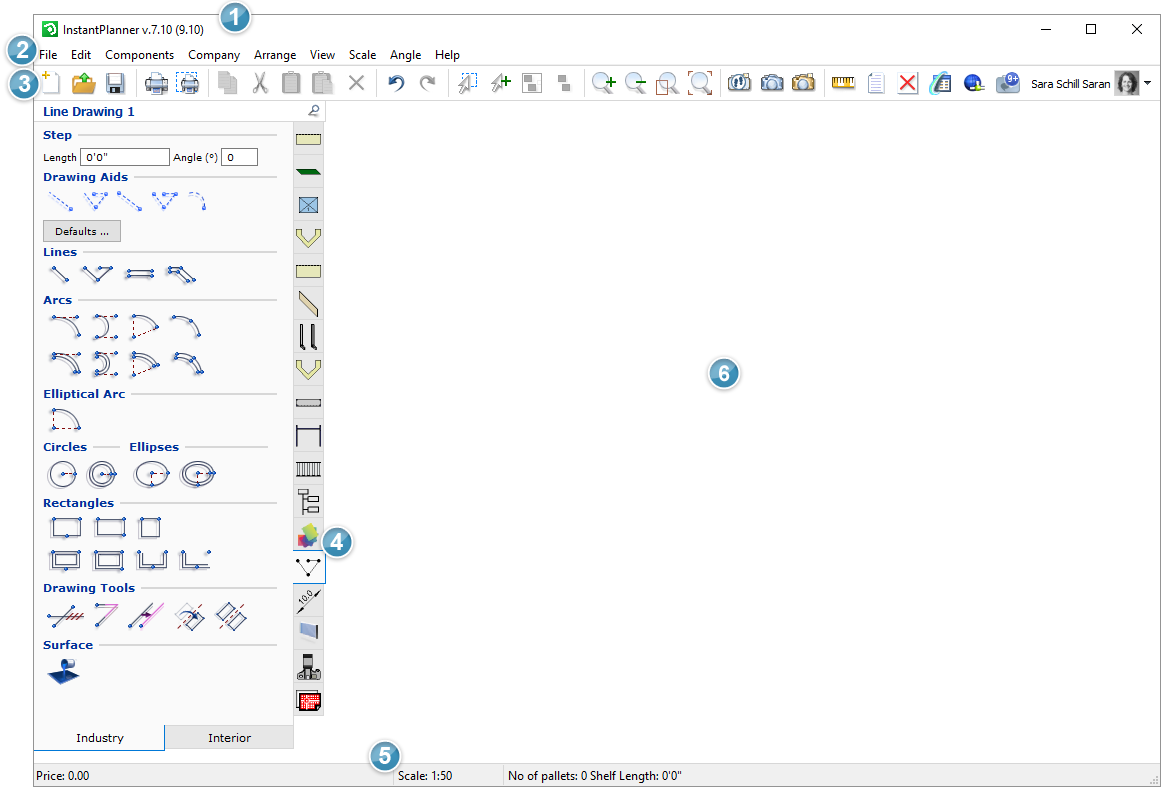
The title bar contains the application name and the version number.
The menu bar contains menus which are common to many software packages: File, Edit and Help. It also contains the following menus which are specific to InstantPlanner : Components, Company, Arrange, View, Scale, and Angle.
The toolbar contains functions which are unique to InstantPlanner, as well as standard Windows options.
From the left the buttons are: New, Open, Save, Print, Print frame, Copy, Cut, Paste, Paste Copies of Elevations, Delete, Undo, Redo, Select Rectangle, Select and Add to Group, Group, Ungroup, Zoom In, Zoom Out, Zoom Rectangle, Zoom in All Objects, Create 3D Walkthrough, Auto 3D (Fast), Auto 3D (Detailed) and the Measuring Tool.
In the toolbar, you'll also find a message notification, showing if there are any new, unread messages on MyConfigura.
The different component tabs to the left of the drawing area contain all the components and features in the program that can be placed on the drawing area. There is a vertical row of tabs (see the figure above) which has a range of icons and a horizontal row with two main tabs: Office/Home and Industry. Select the Office/Home tab if you want to work with generic office components and the Industry tab if you want to work with generic industrial components.
You move between the different component tabs (vertical and horizontal) by clicking on the icons. The icon for the Line Drawing 1 tab, for example, consists of three connected lines, and the icon for the Tools tab is a camera.
At the bottom of the program window is the status bar, which contains three boxes. The left-hand box shows a summary of the prices of the components in the drawing area. The middle box shows the current scale of the items in the drawing area.
The drawing area is the core component of the user interface. This is where all your drawing work takes place and from where you develop images. The size of the drawing area is unlimited, which means that you can click on it and drag it in any direction you want, without ever running out of space.
To do this, follow the instructions below:
Click anywhere in the drawing area, but not on any components. The mouse pointer changes to a hand icon.
Click and hold the mouse button and drag the whole drawing area in the direction you want.
Release the mouse button when you reach the part of the drawing area you want to see.