
The Render & camera settings dialog is where you make all necessary settings to prepare for rendering. It is accessed in one of the following ways:
double-clicking a camera (opens the dialog with the selected camera active)
right-clicking a camera and selecting Render & camera settings from the menu (opens the dialog with the selected camera active)
clicking the Open Render & camera settings icon in the tool bar (opens the dialog with the selected camera active. If you click this button without having first selected a camera, the dialog will open with the Auto camera active).
The main part of the dialog consists of a realtime view showing the view of the currently selected camera. To learn more about it, go to the Realtime view page.
To the left are sections with controls for Realtime options, Preset, Render quality, Image dimensions, Lighting & shadows, Environment, and Camera settings.
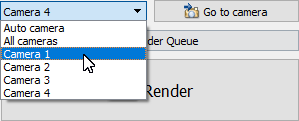
Further down to the left is a drop-down menu that lists all the cameras in your drawing. Selecting a camera from the list updates the live view to show the scene from that camera. Selecting a camera and clicking the Go to camera button zooms in on that camera in the drawing, which makes it easy to find if you are working on a large drawing or have placed many cameras:
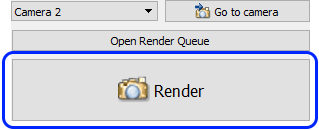
From here, you can also open the Render Queue. The Render Queue opens as a separate window and shows the rendering process as it is being handled by the render server.

After setting up the rendering the way you want it; initiate the rendering process by clicking the Render button:
The render and camera settings are automatically saved in the drawing which makes it easier to render using the same settings the next time you, or somebody else, opens the drawing.
|